
Alrighty, folks, let’s talk about the Essentials for Skillet-Crisped Garlic Bread. Now, I’m not saying I’m a culinary genius or anything, but I’ve been around the bread block a few times, and I’ve got some tips that’ll make your neighbors wanna “borrow” a cup of sugar just as an excuse to come over.👩🍳
First up, you’ve gotta select your warrior – I’m talkin’ about the Bread Selection: Crusty vs. Soft. Now, some of y’all might be thinkin’, “Bread’s bread, right?” Oh, sweet summer child, no. You want a loaf that’s gonna stand up to the heat but still be tender on the inside, like a good-hearted biker. Crusty on the outside, soft on the inside – that’s your ticket to Garlic Bread Town.🍞
Next, you wanna get down and dirty with Crafting the Garlic Compound Butter. This ain’t just butter; it’s butter with benefits. Crush those garlic cloves like they’re talking back to you, mix ’em into that creamy butter, and throw in some herbs until it smells like your Italian grandmother’s kitchen (if you had one, that is). And hey, don’t skimp on the garlic, okay? Vampire-proof that bread!🧄
- Herbs for a Fragrant Touch – This is where you get to play Picasso with your flavors. A little oregano, a sprinkle of rosemary, or a dash of thyme? It’s your world; we’re just toastin’ in it. Just remember, herbs are like cologne – a little goes a long way.
Now, if you’re staring at your loaf wondering how thick to slice it, aim for the Goldilocks zone – not too thin that it’ll burn faster than my ambitions to hit the gym, and not too thick that it’s chewier than a high school drama. Just right, folks. That’s how we’re gonna roll into the next chapter of this saga: Prepping Your Bread to Perfection. Stay tuned, and let’s get that skillet sizzlin’! 🔥
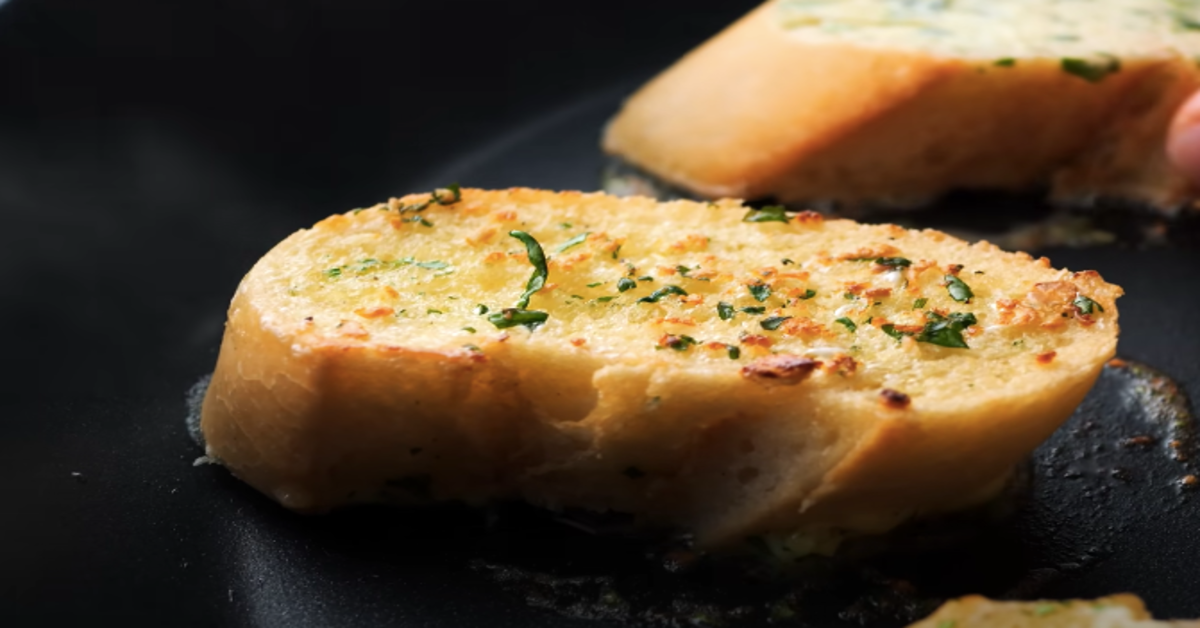
Prepping Your Bread to Perfection
Alright, you culinary crusaders, let’s dive into the heart of our skillet saga – prepping that bread for an unforgettable garlic embrace. Now, slicing your bread is no random hack job; it’s about precision, about capturing that perfect thickness that’s just begging to be crisped to perfection.
Achieving Ideal Bread Thickness
Sure, you could eyeball it, but why leave it to chance? Grab that serrated knife and show that loaf who’s boss. Aim for slices about half an inch thick – thin enough to crisp up, yet sturdy enough to hold the weight of our soon-to-be legendary garlic butter.
Butter Infusion Techniques
Next up, the garlic butter. Oh, the aroma! Start by mashing those lovely, plump cloves of garlic and whip them into your softened butter. Don’t skimp now; this ain’t the time for modesty. Slather that golden concoction generously, making sure every nook and cranny is gleaming with garlicky goodness. And hey, if you’re feeling adventurous, throw in some herbs – maybe a little oregano or thyme from your spice rack. Trust me, your taste buds will thank you.
The Art of Even Coverage
When it comes to buttering, think of yourself as an artist painting a masterpiece. No stroke too broad, no edge left untouched. It’s all about even coverage here, folks. You want that butter to melt evenly while it transforms into crispy heaven in the skillet. Speaking of the skillet, check out this sourdough bread bowl recipe that’ll complement your garlic bread like a culinary sonnet.
And there you have it, the prelude to the sizzle and pop that’s about to ensue. Keep that anticipation high, because up next, we’re firing up the skillet and turning that bread into something that’ll have your neighbors peeking over the fence. So grab your apron, and let’s get that stove-top mastery rolling!
Stove-Top Mastery with Your Skillet
Alright friends, let’s turn up the heat and get into the nitty-gritty of skillet-cooked garlic bread – no oven necessary! You ready to get toasty?
Selecting the Right Skillet
First off, picking out your skillet is like choosing a dance partner for the cha-cha – you want one that can keep up with the rhythm. Cast iron? Non-stick? It’s your call, but remember, cast iron brings the heat like a summer day in Texas, evenly distributing it for that coveted golden crunch. Just make sure your skillet’s as big as your appetite, so you can cook up enough of that garlicky goodness to go around.
Temperature Control for Optimal Toasting
Now, let’s talk about that sizzle factor. Crank up your stove but don’t go bonkers – medium-high heat is your sweet spot. Too hot, and you’ll have a charred mess. Too low, and your bread’s just takin’ a warm bath. Aim for that perfect golden brown, just like the summer tan we all wish we had.
The Secret to Even Browning
Got your bread buttered and skillet ready? Great! Lay those slices in like you’re tucking them into bed, and let ’em sizzle. But here’s the kicker: don’t wander off! Stick around and give ’em a peek every now and then. You’re going for that “just got back from vacation” tan on both sides, right? So patience, my friend, is the key. A gentle press with your spatula ain’t a bad idea either – encourages an even tan and gets you those Insta-worthy grill marks!
And hey, keep your eyes peeled for the next step, because we’re about to flip the script – literally. We’re gonna tackle The Flip Side: Achieving Uniform Toastiness. Stay tuned to perfect that flip and get the scoop on how to keep your garlic front and center, without takin’ a dive off the skillet. 🍞✨
The Flip Side: Achieving Uniform Toastiness
Alright, folks—let’s get flippin’! Literally. So, you’ve got your skillet sizzling and your bread’s soaking up that garlicky, buttery goodness like nobody’s business. But when’s the right time to flip? Patience, my friend. It’s all about that golden-brown sweet spot, and I’m here to help you nail it. 🥖✨
Timing the Garlic Bread Flip
Ever heard the saying, “a watched pot never boils?” Well, in the case of garlic bread, you gotta keep a keen eye on that skillet! You’re looking for those tell-tale signs—the edges turning just the right shade of amber, the butter bubbling with glee, and that heavenly aroma that says, “Flip me now, or risk the char!” About two to three minutes should do the trick, but trust your senses. They won’t lead you astray.
Techniques for a Flawless Turn
Now, for the main event—flipping that bread without sending little bits of garlic flying. You’ll want a spatula that’s both sturdy and agile. Gently slide it under the bread, support the top with your fingers (be brave, it’s just a wee bit hot!), and voilà—flip with finesse. It’s like a little bread ballet, in a pan!
Keeping the Garlic Intact
The last thing you want is a garlic bread that’s lost its…garlic. So, when you’re flipping, be gentle, almost loving. You want each piece to maintain its precious cargo of garlic bits. After all, we’re not making plain toast here—are we?
And with the flip complete, it’s time to let the other side get its moment in the limelight. Another few minutes, and you’ll be ready to pair this crunchy masterpiece with your favorite dish. But let’s not jump ahead!
As you’ve mastered the flip, why not consider stepping up your game even further? Perhaps dabbling in the delicate dance of grilling over coals could be your next culinary conquest. But that, my friends, is a tale for another time…
Alternative Techniques: Grilling Over Coals
Okay, let’s get down and smoky, shall we? If you’re feeling a little wild and have a hankering for that authentic, open-flame flavor, then grilling garlic bread is your ticket to bliss-town. Grilling isn’t just for steaks and veggies, my friends; it’s an open door to rustic charm and those signature, smoky whispers that’ll make your taste buds do a happy dance.
Setup for Grilling Garlic Bread
First things first, get your grill primed and ready. Whether you’re working with charcoal, gas, or wood chips—you gotta crank that fire up and aim for a medium heat. We’re cookin’ bread here, not branding it like cattle.
- Pro Tip: If you’re using charcoal, let those babies glow orange and coat ’em with a bit of ash before you throw on that bread.
Monitoring Charcoal Heat
Now I know you might be tempted to eyeball it, but please, for the love of garlic bread, use a thermometer! Maintaining even heat is crucial; too hot and you’ll scorch the garlic, too cool and, well, you’ll be sittin’ around twiddling your thumbs waiting for a miracle. So, keep it steady at around 350°F – it’s the sweet spot.
Grilling for Optimal Smoke Flavor
Alrighty, it’s time to pop those buttered slices on the grill. And here’s where the magic happens—alignment. Position your bread over the coals, but not directly. You want it dancing with the flames, not getting engulfed. Close that lid and let the smokiness seep into the bread’s soul for a minute or two, then flip it gently using tongs. Trust me, a little char adds character but you don’t want to go full burnt-toast-mode.
“Bread is the king of the table and all else is merely the court that surrounds the king.” – Louis Bromfield. A smoky court in this case!
Remember, this ain’t a set-it-and-forget-it kind of deal. Keep a watchful eye, because a moment too long can mean the difference between just right and just charcoal.
As you’re savoring that irresistible fragrance wafting through the air, think ahead to the next round of your culinary escapade. Now, what would perfectly complement this grilled masterpiece?
No Stove, No Problem: Microwave Method
Ever find yourself in a garlic bread craving frenzy but your stove is a no-go zone? Fear not, my friend! Your trusty microwave can swoop in to save the day. 💥 Let’s talk about how you can achieve soft, buttery garlic bread faster than you can say ‘microwave magician’. 🧙♂️🍞
Achieving Soft, Warm Garlic Bread in the Microwave
First things first, grab that bread – I’m talking about the humble staple lounging in your pantry. Now spread on that rich garlic butter you prepped (microwave garlic bread’s bestie). Next, snugly wrap your future snack in a damp paper towel. This little spa treatment keeps your bread from drying out. Zap it for about 10-15 seconds on high. Ding! 🛎 You’ve got a soft, warm pillow of garlicky joy.
Managing Moisture Levels
Now, remember – moisture is the make-or-break element in this tale of microwavery. Too little, and you’ll be chewing on a dry husk. Too much, and your bread will turn into a sad, soggy mess. Find that sweet spot and your garlic bread will emerge as the soft, warm shareable your heart desires. Just like Goldilocks, aim for just right.
Shortcuts for the Busy Gourmand
On the go and need a quick fix for that garlic hankering? Grab your pre-smothered garlic bread slice, and kiss it with a wave of the microwave magic wand. But here’s a nifty tip – don’t let it spin in circles. Stop the turntable and let your bread soak up the heat from a singular spot. This quirky little standstill keeps it from becoming unevenly warm.
And don’t even worry about transitioning to the next culinary caper – because, let’s face it, there’s always a new kitchen adventure right around the corner. Have you ever considered taking the outdoor route? Stick around, and I’ll reveal the secrets to getting that grill involved. 🍽 🔥
Alright, folks, let’s get to the best part: Savoring and Serving Your Culinary Creation. After all that chit-chat about slicing, dicing, and skillet-flipping, we’ve reached the crescendo of our garlic bread saga. Now grab that parsley—it’s showtime! 🌟
Plating for Visual Appetite
First off, let’s talk about plating. They say we eat with our eyes first, am I right? When your garlic bread is golden brown and smelling like heaven, don’t just plop it on a plate. Fan it out! Show off those crispy edges so they sparkle like a carb-laden treasure. Wanna up your game? Drizzle a little extra virgin olive oil and a balsamic glaze for a gourmet look that says, “Hey, I’m more than just a pretty face.”
Pairing with Soups and Pastas
Now, when it comes to the big match-up, think of your garlic bread as the trusty sidekick to your main superhero dish. A steamy bowl of tomato soup? A twirling nest of spaghetti? They’re begging for the crunch and zip of your skillet-toasted wonder. And remember, variety is the spice of life, so don’t be shy about experimenting. Maybe a garlic bread with a Caesar salad for that crunchy crouton vibe? Why the heck not! 💡
- Pro Tip: The subtle crunch of garlic bread pairs nicely with a creamy soup, balancing textures like a foodie tightrope walker.
Quick Fixes for Leftover Garlic Bread
What to do with leftovers, you ask? If by some miracle you’ve got leftover garlic bread—which let’s be honest, is a rare occasion in my house—get creative. Transforming it into croutons is a 10/10 move for salads or soups. Or hey, chop it up and throw it into an egg bake for a brunch that’ll make your neighbors want to jump the fence.
As the saying goes, “Waste not, want not.” So, get those creative juices flowing and give that garlic bread a second act worthy of a standing ovation!
FAQs on Oven-Free Garlic Bread Adventures
Stick around as we slice through the mysteries of bread selection, tackle storage hacks, and maybe share a secret or two from our garlicky vault.
Yo folks, let’s huddle up👩🍳💬! We’re about to dive deep into FAQ territory – that’s right, we’re talkin’ the fine art of skillet garlic bread. So, you’ve tried your hand at this crispy delicacy and now you’re buzzin’ with questions, aren’t ya? 😉 Well, strap in ’cause we’re about to get down to the nitty-gritty!
Best Bread for Skillet Garlic Bread
Here’s the scoop: it’s all about that texture, baby! 🍞 You want bread that’s got backbone, but can still play nice with the butter and garlic. A hearty artisan loaf with some serious crust action is your golden ticket, but hey, don’t sweat it if your kitchen’s rocking a softer vibe – a thick slice of your good ol’ standby will still crisp up like a charm in that skillet!🔥
Prolonging Freshness and Flavor
Now, let’s talk leftovers (as if that’s a thing with garlic bread 😆). But seriously, if you’ve got extra, keep it in an airtight container or wrap it up snug in aluminum foil. Pop it in the fridge, and later, give it another quick sear in the skillet – just like day-old pizza, sometimes it’s even better the second time around!
Creative Variations to Traditional Garlic Bread
Alright, let’s jazz it up! Who says you gotta stick to traditions? Throw in some cheddar or mozz for a melty twist, or swap the parsley for a sprinkle of rosemary for a woody kick. And garlic? Sure, it’s in the name, but onions or shallots can join the party too. It’s like your taste buds’ version of Mardi Gras. 🎉
So there you have it, my carb-loving compadres. Next time you start craving that skillet magic, remember that versatility and creativity are your best pals. Keep mixin’, matchin’, and munchin’ – and don’t forget, your skillet’s always ready for the next bread escapade. 🍞✨
Overall, just have fun with it and make it your own. Embrace the mistakes – they’re just “flavor opportunities” waiting to happen, right? 🤷♂️ Thanks for stopping by, my fellow garlic-scented warriors! Keep those skillets sizzling and your spirits high!
P.S. Did you know that garlic bread dates back to at least ancient Rome? Those Romans knew what was up! Till next time, “Keep your friends close and your garlic bread closer!” 😉👋