
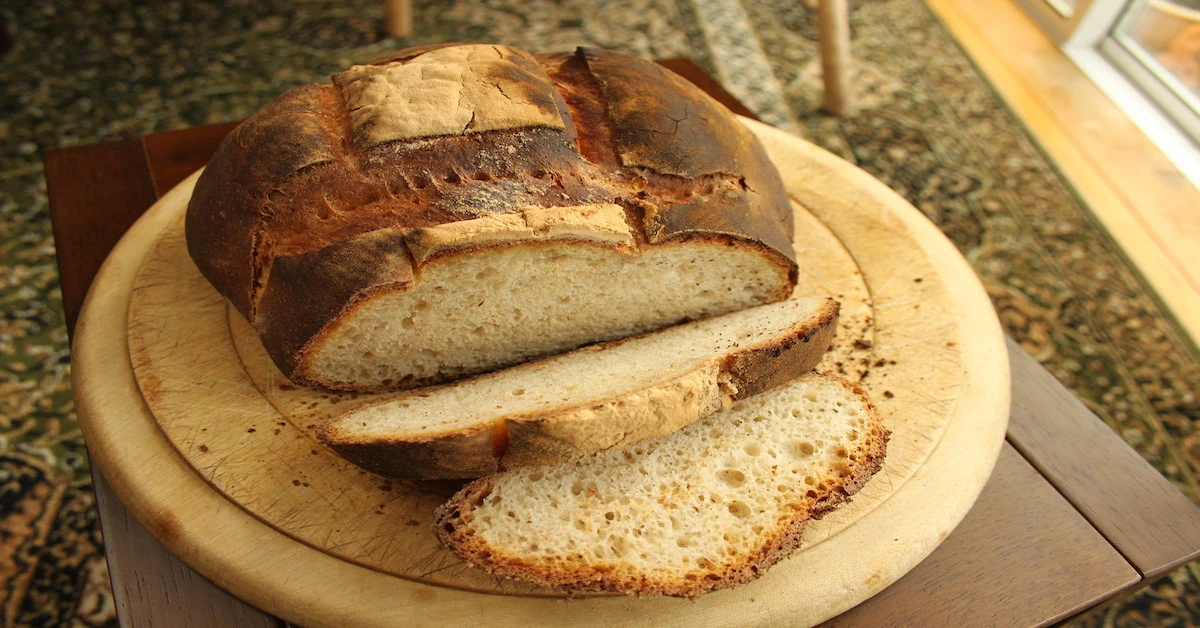
Embracing the Artistry of Sourdough Bread Bowls
Oh, sourdough bread bowls, you edible pots of gold at the end of my culinary rainbow! You know, whipping up these beauties is kind of like performing a high-wire act in the kitchen. It’s a delicate balance of ingredients, timing, and technique that might just make you feel like a bread-whispering wizard when you get it right.
The Origins of Sourdough Craftsmanship
Let me tell ya, the history of sourdough is kinda like reading a who’s who from the wild yeast world. It’s been around since the Ancient Egyptians and has been the buddy of bakers for centuries. And the best part is that it ain’t just about the bread, folks. Sourdough bread bowls are the ultimate comfort food container!
The Versatile Nature of Bread Bowls
Now, don’t get me started on the versatility of these doughy delights. They’re like the Swiss Army knife of the bread world. Whether it’s chowder, chili, or even some creamy artichoke dip, these bowls got you covered. Soup in a regular bowl? Pfft, that’s so last century.
And here’s a hot tip for ya: the key to that oh-so-satisfying crunch? It’s all in the bake, my friends. Bake it like your love life depends on it, and you’ll be rewarded with a bowl that’s got more bite than a great white. But, keep it on the down-low; we can’t have everyone making bread bowls this good, now can we?
So, keep your eyes peeled like potatoes, my fellow bread bowl enthusiasts. We’re diving deep into the doughy trenches, showcasing that with a pinch of patience and a sprinkle of love, you too can be the Van Gogh of the bread bowl world. Stay tuned, bake on, and remember – life’s too short for soggy bread!
Cultivating Your Sourdough Starter: A Love Affair with Yeast
So, you wanna jump on the sourdough bandwagon, huh? Well, buckle up, buttercup – it’s quite the ride! Getting your own sourdough starter going is like adopting a pet. It’s got personality, it’s a little bit unpredictable, and boy oh boy, does it love to eat. But hey, isn’t that half the fun?
The Genesis of a Healthy Starter
Starting your starter – sounds kinda meta, right? It’s basically just flour, water, and a whole lotta love. Mix ’em together and wait for the magic to happen. And by magic, I mean those wild yeasts in the air that start throwing a party in your mixture. But, and here’s the kicker, you gotta keep that environment just right. Not too hot, not too cold, and just the right amount of moisture. It’s like Goldilocks and her porridge, but with more bubbles and less bears.
Maintaining and Feeding Your Culture
- Consistency is key. Feed your starter at the same time each day with equal parts flour and water. It’s like a little breakfast in bed for your yeasty friend.
- Observe and adapt. Too many hooch (that’s the liquid on top)? Your starter might be telling you it’s hangry. Not rising much? Might need a warmer spot or more frequent feedings. It’s all about reading the signs.
- Patience, my friend. A good starter takes time to develop its flavor and oomph. Give it at least a week before you start panicking and thinking it’s taken an eternal nap.
Remember, the road to a dynamite sourdough starter is often paved with a few flatbreads and brick-like loaves. But when you finally nail it, and that starter is bubbling away like a witch’s cauldron? Pure. Baking. Bliss. So stick with it, ’cause that little jar of goop? It’s gonna be your best baking bud.
The Valiant Vessels: Forming and Shaping Your Dough
Let’s roll up our sleeves and dive into the world of dough! It’s one thing to mix up a batch of sourdough, but it’s a whole ‘nother ballgame to shape it into something that’s not only delicious but also downright functional. I’m talkin’ about those sturdy sourdough bread bowls that’ll hold your soup like a champ.
Techniques for Perfectly Rounded Bowls
First things first – getting that dough into a perfect sphere is more art than science. After your dough has risen and is filled with all that yeasty goodness, punch it down (gently, now – it’s not a real fight). Then, grab a chunk of dough about the size of a baseball. Cup your hands around it and rotate it on a non-floured surface. This little whirl and twirl will help tighten the gluten cloak – yep, that’s a real thing – and shape it into a nifty little ball. Keep at it until you’ve got a smooth, taut round of dough that says, “I’m ready to cradle your chili.”
Tips for Achieving the Ideal Bread Bowl Thickness
- Feel the Wall: When your dough balls are shaped and ready for a second proof, give ’em a nice pat. You’re looking for a wall thickness of about a half-inch. Too thin, and your stew’s swimming away. Too thick, and you’ll need a jackhammer for that first bite.
- Let it Rest, but Not Too Long: You want the dough to rise until it’s puffy, but still firm enough to hold its shape. Aim for a proofing time that leaves the dough springy to the touch. It’s like waiting for the perfect marshmallow roast – timing is everything!
- Score for Success: Before you pop those bad boys in the oven, give them a little score with a sharp knife. Not only does this add artisanal flair, it controls where the dough expands, preventing an unexpected breadsplosion.
And there you have it – a crash course in crafting the valiant vessels that are sourdough bread bowls. Remember, practice makes perfect, and before you know it, you’ll be shaping dough like a pro. Happy baking, folks!
The Thermal Odyssey: Baking Your Sourdough Bread Bowls
Listen up, folks! Baking, my friends, is where the rubber meets the road – or should I say, where the dough meets the heat? And when it comes to sourdough bread bowls, you’re not just baking; you’re orchestrating a symphony of temperature and timing. Let’s dive into the fiery abyss of the oven and talk about how you can bake these crusty beauties to perfection.
Finding the Optimal Oven Temperatures
Now, don’t just go cranking your oven willy-nilly. It’s all about finding that Goldilocks zone for temperature. You start with a preheat that could double as a sauna – we’re talking hot, maybe around 425°F (220°C). This initial blast gives your dough a swift kick in the rise!
Secrets to a Golden and Crunchy Exterior
Oh, the crunchy exterior – that’s what we’re gunning for, right? Here’s a little trick: throw a couple of ice cubes into a pan at the bottom of your oven right before you slide the bread bowls in. The steam works like a charm, giving you that artisanal, crackly crust we all dream about. And keep an eye on your darlings! You’ll want to rotate them halfway through to ensure they tan evenly – because nobody likes a lopsided tan.
- Steam is your friend – It’s not just for veggies, folks. It works wonders on your crust.
- Hot and fast – Start high, get that oven spring, then you can dial it back a notch if you need to.
- Rotate for greatness – Don’t play favorites; give each bowl its time in the spotlight.
Before you know it, your kitchen’s gonna smell like a bakery straight outta Paris, and those golden globes of glory will be ready to exit stage left from the oven. Let them cool just a smidge, but don’t dawdle – you want to serve these bad boys while they’re warm and just begging for some soup!
So, let’s recap: Hot oven, steam for the win, a watchful eye, and a timely rotation. Stick to this game plan, and you’ll be the MVP of bread bowls.
In closing, remember, practice makes perfect. If the first batch isn’t quite Michelin star-worthy, don’t sweat it. Adjust, adapt, and attack it again. You got this!
Thanks for sticking with me on this toasty journey. Keep on baking, and don’t forget – bread bowls are not just food; they’re a warm hug for your soup. 😊
Troubleshooting Common Conundrums in Bread Bowl Baking
Let’s face it, friends—baking sourdough bread bowls can sometimes feel like you’re trying to solve a Rubik’s Cube with oven mitts on! But fret not, ’cause we’re about to tackle those pesky problems that can make or break your edible masterpieces.
Addressing Under-proofing and Over-proofing Dilemmas
Ever ended up with a bread bowl that’s as flat as a pancake or puffier than a blowfish? That’s the proof in the pudding—or should I say, the proofing in the bread bowl.
- If your bowls have a Napoleon complex, give ’em more time to rise. They’re just not ready to conquer the world yet.
- And if they’re spilling over the edges like an overzealous fountain, reign ’em in! They’ve partied enough and need to hit the oven.
Cracking the Code on Soggy or Dense Bowls
Now, nobody wants to dive into a bread bowl that’s got the texture of a sponge—or worse, a brick. Here’s the scoop on keeping your bowls just right:
- A soggy bottom is a no-go. Ensure your oven is hot as a firecracker before those bad boys go in.
- Density like a black hole means you’ve probably been a bit heavy-handed with the flour. Lighten up, my friend!
Pro Tip: Your sourdough starter is like a moody teenager—it needs attention! Feed it regularly to avoid those unfortunate baking outcomes.
“The perfect bread bowl is a balancing act—like walking a tightrope while juggling flaming batons. But with a little know-how, you’ll be the ringmaster in no time!”
In conclusion, keep an eye out for the tell-tale signs of proofing problems and texture troubles, adjust as needed, and remember: practice makes perfect. Next thing you know, your sourdough bowls will be the talk of the town!
Wishing you warm ovens and successful baking adventures! 🍞😉
Imaginative Fillings: A Harmony of Flavors
Ah, the humble bread bowl. Now, I’m not one to brag but when it comes to sourdough, I’ve got it in the bag – with a perfect balance of chew and tang. But folks, let’s get down to the real nitty-gritty: what goes inside these doughy delights? Anything your heart desires. That’s right, we’re talkin’ a smorgasbord of fillings, all crooning in harmony with that beautiful sourdough funk.
First off, soups. I mean, is there anything better than creamy chowder on a chilly day? Probably not. Imagine dunking chunks of that soft, tang-laden sourdough into a sea of creaminess. And don’t even get me started on spicy chili. It’s like each bread bowl is a mini cauldron bubbling with flavors both smoky and bold, a real treat for sure.
But wait, there’s more! Dips, folks. Who needs chips when a carved-out bread bowl is begging for a heap of spinach and artichoke dip? You’ll be the life of the party, dishing out spoonfuls of that cheesy, veggie-packed treasure, each one better than the last.
- Broccoli Cheese Soup: Turn a classic side into a main attraction.
- Beef Stew: A hearty companion to your bread-y creation.
- Buffalo Chicken Dip: Add a kick that’ll send your taste buds flying.
And here’s the deal, your artistry doesn’t stop at traditional flavors. Ever thrown together a Mediterranean inspired feast within the crusty walls of a sourdough bowl? Ladle in some chunky hummus, sprinkle a bit of feta, olives, perhaps some sundried tomatoes. Before you know it, you’ve got yourself a bread bowl that’s traveled more countries than your passport.
Let’s not forget about the kiddos; a mac and cheese bread bowl can turn any frown upside down – can I get an ‘Amen’ for extra cheesy goodness?
So, whether it’s a creamy dip or a stew that’s been simmering all day, remember: bread bowls are your canvas. Go wild, get fancy, or keep it homey and simple. What matters is that you have a bowl-ful of fun!
Savoring and Preserving Your Edible Art
Alrighty, folks! Let’s get down to the nitty-gritty of making sure our sourdough bread bowls are still the talk of the town, even after the last spoonful of soup is long gone. Now, don’t you just loathe it when something that delightful turns into a stale, sad memory? Me too! So, here’s the skinny on enjoying those bowls while they’re fresh outta the oven and keepin’ ’em good for the next round.
Tips for Enjoying Your Bread Bowls at Peak Freshness
First things first, you want your bread bowl experience to be top-notch, right? Timing is everything. I mean, who doesn’t love a warm bowl with that soupy goodness making the rounds? So, here’s a Pro Tip: right before plating, give your bowl a quick toast. Just a little heat-up in the oven. It’ll bring back that just-baked vibe, trust me.
- Get Toasty: A quick oven visit revives the crunch.
- Immediate Indulgence: Enjoy ASAP for the best taste and texture.
- Soup’s On: The soup should be piping hot, filling up that bowl with love and warmth.
Storing Leftovers for Continued Enjoyment
No one fancies a bread bowl that’s tougher than a two-dollar steak. Keep it soft and inviting by wrapping it in beeswax paper, would you? Toss it gently into the fridge, and when the craving hits again, a little oven time works wonders. Remember, bread’s worst enemy? Moisture. Keep that in check and you’ll avoid the dreaded sogginess.
| Storage Tip | Why It Works |
|---|---|
| Beeswax Paper Wrap | Prevents drying out and keeps it eco-friendly 🌍 |
| Refrigerate It | Keeps away from those pesky countertop bacteria |
| Oven Reheat | Brings back the warm, cozy feels |
And listen up, if your bread bowl has crossed the prime time and started to harden, don’t toss it! Turn those leftovers into croutons or breadcrumbs. A little culinary upcycling never hurt anybody, huh?
In closing, it’s all about loving your bowls while they’re fresh and giving ’em a second chance when they’re a tad past their prime. Oh, and next time you whip up a batch, invite me over, will ya? 😉
Thank you all for taggin’ along on this bread bowl saga. You keep bakin’, and I’ll keep crackin’ corny jokes. ‘Til next time, keep your bowls full and your hearts fuller.
FAQs: Unveiling the Mysteries of Sourdough Bread Bowls
Hey, fellow bread enthusiasts! Got burning questions about conquerin’ the wild world of sourdough bread bowls? You’re not alone. Let’s dig into the doughy details and clear up some of that head-scratchin’ mystery!
Can Sourdough Bread Bowls be Prepped Ahead of Time?
Absolutely, my time-strapped friends! If you’re juggling kids, work, or just life in general, you can knead your dough ahead of time. Shape ’em, chuck ’em in the fridge, and let ’em have a cold fermentation slumber party. Not only does this save time, but it also gives your bowls an even bolder flavor. Just remember to let ’em wake up to room temp before you fire up the oven.
How to Ensure the Perfect Sourdough Bowl Size for Individual Servings?
Size does matter when it comes to sourdough. For that ‘just-right’ personal bowl, aim for dough balls about the size of a large apple—around 165 grams if you’re the measuring type. They’ll puff up like a proud peacock and be the perfect nest for your soup or dip creations.
Adjusting Baking Times for Different Altitudes
High-altitude home bakers, listen up! At nosebleed heights, bread acts a bit kooky. You’ll wanna jack up the hydration a tad since flour gets thirstier. Plus, show some patience with lower temp and increased baking time. Your bread bowls might be a touch more diva up in the clouds, but boy, will they be worth it!
Whipping up suave sourdough bowls is part baking science, part art, and a whole lotta love. So preheat that oven, and let’s get bready to rumble!
In closing, remember that these little tips are here to guide you in your quest for the upper crust of bread bowls. Keep baking, keep experimenting, and who knows? You might just dough down in history. Thanks for reading, bread-hed!