
Hey there, fellow bakers and cake enthusiasts! So, you’re thinking of diving into the whimsical world of boob cakes, huh? Well, strap on your apron and get ready to laugh and learn, because we’re about to get into the nitty-gritty of prepping for this hilarious, yet delectable, dessert. 🎂😂
Before we start mixin’ and bakin’, let’s talk shop about what you’ll need to create your mammary masterpiece.
Choosing the Right Cake Mix: Flavorful Options
First up, you gotta pick your poison – and by poison, I mean the cake mix, of course! Whether you’re a devil’s food diehard or a vanilla virtuoso, the flavor is key. But hey, why not get funky and try a red velvet or even a spicy cinnamon? The world’s your oyster, or in this case, your bakery! Just remember, if it tastes like cardboard, not even the best icing technique can save it, so choose wisely.
Bakeware Secrets: Selecting the Perfect Molds
Next, we’re talking molds. Now, unless you’re a sculpting savant, finding the perfect boob mold is crucial. I mean, you want these babies to look realistic, right? You can snag these special molds at your local craft store or online – yep, there’s a mold for just about everything these days. Silicon molds are aces because they’re flexible and make it a cinch to pop out your cake without smooshing it. Talk about a boob job well done!
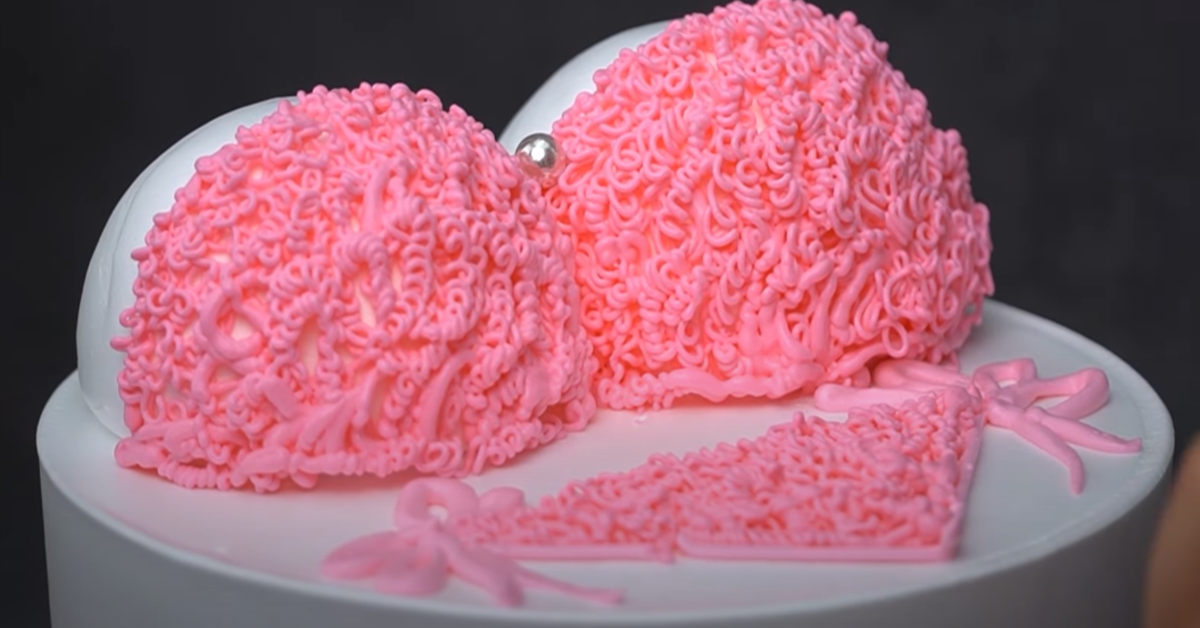
Decorative Touches: Fondant and Icing Tips
Lastly, let’s chat about the cherry on top – or, should I say, the nipple on the boob? 😜 Fondant can be your best friend for smooth, seamless finishes and those realistic touches, but it’s a tricky beast. My tip? Keep your hands cool and work quickly to prevent it from turning into a sticky mess. As for icing, getting that creamy, dreamy texture is all about balance – you want it stiff enough to hold up, but soft enough to spread without tearing your cake apart. A touch of patience and a lot of love will take you far!
Now that we’ve got our ducks, or boobs, in a row, you’re ready to whip up the base like a pro. Stay tuned for the next slice of advice where we’ll dive into the art of blending that perfect batter. Remember, it’s not just what’s on the outside that counts – it’s what’s on the inside that makes your cake a true knockout! 😉
Whipping Up the Base: Batter Blending Techniques
Now folks, let’s talk turkey – or should I say, cake? When it comes to creating the base of your boob cake, you’ve got to mix it like a pro. First off, you don’t want a batter that’s thicker than a Thanksgiving gravy, nor do you want it runnier than your Aunt Edna’s “famous” watery soup. So, let’s get down to the nitty-gritty of achieving the perfect consistency.
First off, dump those ingredients together and mix ’em up! But hey, not too fast, cowboy. Overmixing is the arch-nemesis of fluffiness, and we’re aiming for clouds, not bricks. Now, to get air into that mix – the secret weapon to making your cake as light as Grandma’s feather bed – you’ve gotta whip it good. But like all good things, moderation is key.
For those of you with dietary restrictions, fear not. You can swap out the usual suspects for some alternative ingredients. Think almond milk, gluten-free flour, or even applesauce instead of oil – get creative! Check out this article on fluffy Kodiak pancakes for some inspiration on working with alternative ingredients.
Sculpting the Perfect Shape: Baking Basics
- Molding Your Masterpiece: When it’s time to pour that golden elixir into the molds, do it with the grace of a swan diving into a lake – gentle and precise. Then, give that pan a little tap-tap on the countertop; we’re not making music here, but we are getting rid of those pesky air bubbles.
- Checkpoints: Keep an eagle eye on your baking cake. When the edges are starting to look tan like they’ve just returned from a vacation in the Bahamas, it’s almost showtime.
- Cooling Strategies: Patience, padawan! Let that cake cool off before you start any sculpting. Think of it as a cake spa day – it’s essential for setting the shape.
Alright, once you’ve baked your cake halves to golden perfection, you’re ready to move on to the next phase of your boob cake escapade. Crafting a realistic appearance isn’t just about artistry; it’s about finesse and technique. And just like a cliffhanger in your favorite TV show, I’m gonna leave you wanting more – so stay tuned for how to finesse those details into your cake and make it a feast for the eyes as well as the belly!
Sculpting the Perfect Shape: Baking Basics
Alright, folks—the oven is preheating, and I can almost smell the sweet scent of victory (or is that vanilla I’m whiffing?). Now, let’s get down to business and chat about turning your batter into a sculpture that’s sure to raise some eyebrows—and I mean that in a good way. 😏
Molding Your Masterpiece: Techniques for Symmetry
Listen up, Michelangelo! When we’re talking about crafting a boob cake, symmetry is the name of the game. You want both halves to look like they’re on speaking terms, right? So, here’s the scoop: get yourself some reliable molds. They’re like GPS for your cake; you won’t end up with a lopsided fiasco. And remember, grease ’em up good—nothing’s sadder than cake that sticks like it’s got separation anxiety.
Checkpoints: Knowing When It’s Baked to Perfection
Now, don’t just stand there watching the oven like it’s the season finale of your favorite show. Use the time wisely! Check your cake’s progress with a toothpick—if it comes out cleaner than a whistle, you’re golden. But hey, a few crumbs? That’s okay too; it just means your cake will be moist, and who doesn’t want that?
Cooling Strategies: Setting the Shape Right
- Here’s a hot tip: cooling is just as important as the baking itself. Why? Cause we’re not looking for a boob landslide. Let your cake sit for a bit in the pan, then transfer it to a wire rack.
- Patience, my friend! Rush this, and you’ll end up with cracks bigger than the Grand Canyon. Let ’em cool completely before you even think about icing.
Now, with those puppies cooled off, you’re probably itching to move on and bring it all together, right? Well, don’t fret—I’ve got you covered in the next section where we’ll dive into Crafting a Realistic Appearance: Finessing Details. It’s gonna be like the cherry on top, except it’s nipples—we’ll get to that! 😉
Crafting a Realistic Appearance: Finessing Details
Alright, my fellow bakers and cake artists, let’s get down to the nitty-gritty of turning our cake from blah to ta-da! Now, we’ve nailed the shape, and it’s time to tackle the real challenge – making it look as real as possible. And boy, do we have some tricks up our sleeves!
Color Blending for Natural Skin Tones
First things first, skin tones – they can be tricky, but with the right combination of colors, you’ve got this in the bag. Start with a base color that’s close to your desired skin tone. Then, gradually add small amounts of color to achieve the perfect shade. Remember, it’s like mixing paint; a little bit goes a long way! Plus, if you’re aiming for a tan look, why not check out this guide on creating a bronzed effect – it’s not just for bread bowls, folks!
Texturizing for an Authentic Feel
- To create a realistic skin texture, use specialized tools or even a simple toothbrush (unused, of course) to create fine lines and pores.
- Gently press against the fondant to give it depth and dimension without going overboard.
Adding Nipples: A Subtle Art
Now, for the pièce de résistance – nipples. It’s all about subtlety here. You can either shape them out of fondant or use a small amount of icing to give the raised effect. For color, blend a dab of pink or brown, depending on your skin tone, and voila – you’ve got yourself some realistic nips!
Once you’re done with these details, your cake will be looking pretty lifelike. So, pat yourself on the back, but don’t stop there. We’ve got to ensure our masterpiece doesn’t just sit pretty but stays put together. Hang tight as we move on to the next step!
Assembling with Artistry: Joining the Halves
Alrighty, crafty bakers, you’ve nailed the baking part, and now you’ve got two beautiful cake-halves sitting on your counter, just itching to become a full-fledged boob cake. The magic’s in the merging, so let’s get those twins united!
Seamless Fusion: Icing as an Edible Adhesive
First things first, icing ain’t just for looks—think of it as your edible super glue. You’ve gotta spread a generous layer of buttercream or ganache on the flat sides of your cakes. Here’s a pro tip: pop the icing in the fridge for a bit before you get to slathering. Why, you ask? Well, it makes it easier to handle and oh-so spreadable. Just imagine you’re spackling a wall, only it’s delicious, and you can lick the spoon (we won’t tell).
Support Techniques: Ensuring Structure Integrity
This is where things get structural. If you’re stacking some serious layers, you’re gonna need some dowels or straws to keep your cake from turning into the Leaning Tower of Pisa. Insert them in a circular pattern around where the center of the top half will sit, then gently place the top half on. Be sure your hands are steady—think surgeon-steady—and gently press down to make sure it’s secure. And voilà, that cake ain’t going anywhere!
Smooth Transitions: Blending for a Unified Look
Okay, you’re on the final stretch. It’s like that part in the movies where the protagonists smooth out their differences, only it’s you and your cake getting smooth. Take some more icing and fill any gaps at the seam, then use a palette knife or the back of a spoon to blend it in, really focusing on making it seamless. And not just Hollywood movie seamless where you can still see the plot holes—no, we want real-deal smoothness.
Now, don’t forget to jazz it up with your personal flair, whether it’s a sprinkle of sass or a dollop of elegance. Carry on, and let’s see where your creativity takes you as you accessorize this sweet masterpiece!
Final Embellishments: Accessorizing Your Cake
Hey there, cake crusaders! Now that you’ve baked the most fabulous boob cake foundation known to mankind, it’s time to jazz it up with those final snazzy touches that’ll make your sweet treat the talk of the town. 💃🍰
You’ve got your shape down pat, but a boob cake ain’t complete without a little pizzazz, right? So grab your edible glitter, your freshest berries, and a bucket-load of creativity – we’re diving into the world of cake accessorizing!
Garnishing with Edibles: Berries and Edible Glitters
First off, let’s talk berries. Strawberries, blueberries, raspberries – oh my! Not only do these little gems add a pop of color and a burst of natural sweetness, but they’re also kind of healthy (fruit on cake counts, don’t argue with me here, folks).
- Strategically place them berries around the base, or use ’em to create a dazzling pattern atop your cake.
- Edible glitter is like fairy dust for your cake – a little sprinkle here and there, and you’ve got a sparkling masterpiece.
Draping with Fondant: Fabric Imitations
Now, who’s ready to play dress-up with fondant? Roll out that sugary dough and drape it over your cake, just like a haute couture gown for your edible mannequin. You can even mimic ruffles, lace, and draping for that sophisticated touch.
- Tint that fondant to match your theme or go wild with bold patterns – it’s your canvas.
- Get intricate by embossing designs or sculpting fondant jewelry, ’cause why not?
Personal Touches: Custom Decor Ideas
Let’s not forget those quirky, personal details that give your cake charm and individuality. Have an obsession with crazy socks? Make tiny fondant versions to perch on the cake base. Or maybe you want to tip your hat to that time you made too much cheesecake batter and turned it into cake pops? Create little cheesecake truffle decorations!
- Think outside the box with 3D printed cake toppers or custom messages penned with edible ink.
- If the cake’s for a special occasion, reflect the recipient’s personality with unique toppings.
Remember, with final embellishments, it’s not just what you add, but how you add it. Now go forth and adorn that bosom… I mean, blossom into the realm of cake decoration royalty! And don’t forget – after all this fun decorating, we’ll jump right into mastering the almighty piping bag. Stay tuned, because things are about to get even more delectable!
Mastering the Piping Bag: Icing Like a Pro
Hey there, cake crusaders! 🎂 Ever watched one of those baking shows and marveled at how those wizards wield a piping bag like it’s an extension of their arm? Well, honey, today you’re in luck because I’m about to spill the beans on how to make that piping bag bow to your will. Let’s dive into the sugary trenches of cake decorating, shall we?
Piping Basics: Holding and Pressure Control
First things first, let’s talk grip. It’s like holding a pen but, you know, don’t squeeze it like your nephew squeezes his ketchup bottle — unless you want a frosting explosion. You’ll want to twist the end of the bag, cozy it into the palm of your dominant hand, and use your other hand as a guide.
“Keep a steady hand and an even steadier heart when piping. It’s like texting your ex; you’ve got to be precise, composed and maybe don’t do it when you’re emotionally compromised.”
Intricate Patterns: Perfecting Your Technique
Now, for all those fancy shmancy swirls and twirls. Start with simple lines and work your way up to those delicate flowers and leaves. Practice on a piece of parchment before taking to the cake, kinda like a dress rehearsal but with more sugar. Remember, it’s all in the wrist action!
- Steady as she goes: Keep that pressure consistent for uniform designs.
- Cool runnings: If that frosting gets too warm, plop it in the fridge for a few. No one likes a droopy rose.
- Sweet escape: A tiny toothpick can rescue you from any icing mishap. Call it your plan B.
Troubleshooting Common Piping Dilemmas
So, you’re in the midst of icing excellence and BAM, things go sideways. Clogging? If your icing is smoother than a jazz tune and that bag is free from crumbly culprits, it won’t clog. Keep it clean, folks. Unruly icing? That’s all about temperature. Warm hands, cold heart is the mantra here. Not too warm, not too cold.
Right then, now that you’re feeling a tad more confident with your piping prowess, let’s not put a lid on it yet. Next up, we’re taking a cheeky peek (pun intended) into what’s probably crossed your mind: “Cool story, bro, but what if my cake looks more Picasso than Patisserie?” Stick around as we iron out those creases in the upcoming segment, “FAQs about Crafting a Boob Cake.” 🍰 And remember, it ain’t about perfection—it’s about expression, the joy of creation, and, well, licking the spoon.
FAQs about Crafting a Boob Cake
Sooo, you’ve gotten through the nitty-gritty, and your soon-to-be legendary boob cake is almost ready to blow minds at the party. But, hold up! I betcha there’s a couple ‘a curveballs you didn’t see comin’. Don’t sweat it! Let’s tackle those head-scratchers together, one cup… I mean, one step at a time 🔍🍰. Here goes nothin’!
Overcoming Shaping Challenges: Tips and Tricks
Ya got a lumpy lady lump? It happens to the best of us. To smooth out those peaks and valleys, think like a sculptor. Sometimes, all you need is a bit of patience and a steady hand. Trim away any excess with a serrated knife, and remember – it ain’t gotta be perfect to be appreciated! 🤷
Preserving Freshness: Storage Guidelines
Wanna keep that bodacious cake lookin’ and tastin’ fresh until go-time? Simple – keep it cool, but not like James Dean cool, we’re talkin’ fridge cool. Airtight containers or some cling film will do the trick. Just don’t freeze ’em, unless you want frostbite on your frostin’, capisce?
Where to Find Specialty Supplies and Inspiration
- Finding the Right Shops: “Hey Google, where can I find boob cake pans?” Or just hit up that local bakery supply store; the folks there know their stuff.
- Scrolling for Ideas: Instagram and Pinterest are like a treasure trove of cake inspo—if it exists, someone’s probably made a cake of it.
- Joining Communities: Facebook groups and Reddit are swarming with cake wizards who’d love to share a spell or two.
And, hey, if you’ve got more questions, never fear! The cake community is super friendly – so just ask around. We’re all here to help each other out, and, let’s face it, laugh together too ’cause… boob cakes 😂.
In closing, go forth and create that masterpiece. And remember, when life gives you lemons, make lemon-flavored boob cake! Thanks for stickin’ with me, and may your icing always be fluffy! 🍰✨