
Hey there, sugar plum! Ever wanted to dip your toes into the sweet world of hair removal without stepping outside your kitchen? Well, buckle up, buttercup—because we’re diving headfirst into the whimsical world of DIY sugar waxing—and get this—without the usual squeeze of lemon! 🍋
Now, I know what you’re thinking: “But isn’t lemon juice the heart and soul of the sugaring potion?” Fear not, my intrepid DIYers, for we’re about to unravel the delightful science behind crafting this gooey magic, and trust me, it’s as fascinating as it sounds.
Understanding the Role of Acidity
Alrighty, first things first. Acidity in sugar wax isn’t just there to make your nostrils flare. It’s the unsung hero that ensures your sugary concoction doesn’t morph into a caramel candy. It keeps the sugar from becoming too friendly with itself and crystallizing. While lemon juice is the go-to acid, don’t fret; we’ve got alternatives up our sleeve.
Why Sugar and Heat Synergize
Here’s where things heat up (literally). Sugar, you see, when it gets all cozy with heat, transforms into a smooth, sticky substance that’s a dream for yanking out those pesky hairs. It’s a match made in heaven, but only if you play your cards right with the temperature💡.
Replacing Lemon Juice Mysteries Revealed
- So, how do you swap out our citrusy friend? Vinegar is a snazzy sidekick, bringing the right amount of tang to the table.
- What about a dash of cream of tartar? Yep, that’ll whip your sugar into shape just fine.
- And hey, if you’re feeling adventurous, a bit of honey might just do the trick (talk about keeping it in the sweet family, right?).
The key is to maintain that perfect pH balance—not too acidic, not too sweet—just right. You want that goldilocks zone where the sugar strips away hair like you’re peeling off a Band-Aid from your little bro’s elbow—quick and fuss-free!
As we saddle up to move onto Gathering Your Kitchen Alchemy Tools, keep your whisks at the ready, ’cause we’re about to stir up a storm (without making your kitchen look like a scene from a horror movie, promise). 🧙♀️
Gathering Your Kitchen Alchemy Tools
Alright, my fellow kitchen wizards, let’s roll up our sleeves and dive into the nitty-gritty of preppin’ our tools for some sugar wax alchemy, shall we? Sure, we’re skipping the lemon juice, but that doesn’t mean we can skimp on the gear. You’re gonna need the right utensils to stir up some sticky magic.
- Must-Have Utensils for Wax Making
First things first, let’s chat about the bare essentials. You’ll need a sturdy pot – think trusty cauldron vibes – that’s heavy-bottomed to distribute heat evenly. Then, grab a wooden spoon for stirring; it’s your wand in this whole process, after all. And don’t forget a candy thermometer – it’s like your crystal ball, telling you when the concoction is just right.
- The Optimal Pot for Concocting Sugar Wax
Now, about that pot. You’re looking for something that’s not too big or too small, but just right. A medium-size saucepan should do the trick. It should be just the right size for mixing up your ingredients without splattering your entire kitchen. And hey, if you’re in need of some inspiration, maybe check out this article on perfecting fluffy pancakes – because who doesn’t want a sweet treat after a hard day’s waxing?
- Temperature Tools for Precision
Gettin’ the temperature spot-on is a deal-breaker, folks. A candy thermometer is a champ for this job, but if you’re in a pinch, a regular kitchen thermometer can stand in. Just make sure it can handle high temps. The goal? To avoid undercooking or, heaven forbid, burning your sugar to a crisp.
Now, once you’ve corralled all your tools, you’re set to start mixin’ those ingredients. Keep in mind, even without the zesty lemon, we’re aiming for a mixture that’ll make your skin as smooth as a baby’s bottom. So, next up, Choosing the Right Sugaring Ingredients. Stay tuned – we’re about to uncover some top-notch substitutes that’ll keep you smooth sailing on your hair removal journey.
Choosing the Right Sugaring Ingredients
Now, don’t you worry your pretty little head off if you’re fresh outta lemons. We’re gonna crack the code on substitutes quicker than a squirrel on a sugar high. Hunting down the best alternative to lemon juice in your sugar wax recipe is like finding the secret sauce for your BBQ – it’s gotta be just right. And hey, who doesn’t love a little kitchen experiment, right?
Natural Lemon Juice Alternatives
So, what’s on the menu? Vinegar steps up to the plate as a fab option – it’s got that zing we’re looking for, plus it’s probably chilling in your pantry right now. And then there’s honey; it’s not just for the bees, folks. This golden delight brings its own antibacterial mojo, making your skin sing. But hey, if you’re feeling frisky, why not give cream of tartar a whirl? It’s got the acidity to cut through the sweetness like a hot knife through butter.
- Vinegar: the pantry MVP
- Honey: sweet with a side of skin-lovin’
- Cream of Tartar: the baking aisle’s best-kept secret
Balancing Sugar-to-Substitute Ratios
Getting this mix right is what separates the rookies from the pros. Too much and you’re stickier than a kid’s hands at a candy store; too little, and you might as well be trying to wax with maple syrup. The trick here is to start with a 1:1 ratio when swapping in vinegar or cream of tartar and tweak as needed – you’re aiming for that Goldilocks zone, not too acidic, not too sweet.
Customizing the Blend to Your Preferences
Now here’s where you get to strut your stuff and make that wax your own. Like your morning coffee, this concoction can be tailored to your liking. A dash of essential oils? Why not! Aloe vera? Bring on the soothing vibes. Feel free to play around until you’ve got a mix that’s as unique as your fingerprint.
And just when you think you’ve got the hang of this, let’s stir things up a bit, shall we? Up next, we’re diving headfirst into The Magic of Mixing Without Missteps. You’ll learn how to avoid turning your kitchen into a modern art display of sugary splatter. So grab your wooden spoons and let’s get ready to mix things up!
The Magic of Mixing Without Missteps
Now, my fellow kitchen alchemists, brace yourselves for the dance of the sugar wax – without the citrus beat. You’re about to become a mixmaster extraordinaire, and here’s how we’re gonna get that pot of gold (or, well, pot of wax) without a lemon in sight. Keep your eyes peeled, because precision is the name of the game.
Stirring Up the Perfect Consistency
Sugar, sugar – oh, honey, honey – it’s not just a catchy tune, it’s the foundation of our wax! Start with your sugar in the pot, and turn up the heat gradually. Now, as you add in the vinegar or whatever acidic compadre you’ve chosen, it’s crucial to stir, baby, stir. And not like you’re paddling a canoe, but with the tender love and care of someone coaxing a genie from a bottle – gentle and consistent. Keep it up until the sugar fully dissolves, making sure those sweet grains have said their goodbyes.
Timing the Heat to Perfection
While some like it hot, sugar wax has its sweet spot. Literally. Crank the heat too high, and your wax will be as hard as grandma’s candy. Too low, and you might as well be spreading syrup on your legs. A candy thermometer is your ally here but if you don’t have one, just eyeball until the mixture bubbles like a witch’s cauldron – minus the newt eyes.
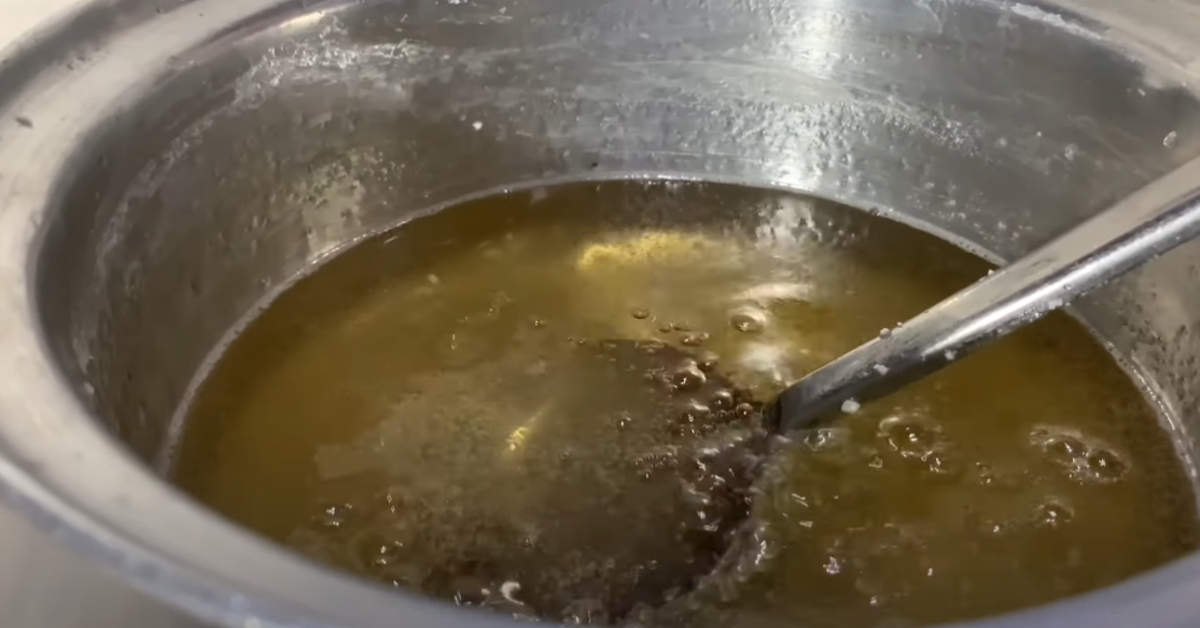
Achieving the Ideal Texture
This is where the magic happens, folks. Once your mix reaches that molten lava stage, it should be amber in color and thickened to the consistency of, let’s say, a thin honey. If it’s looking more like maple syrup on a cold day, you’ve still got some heatin’ and beatin’ to do. If you’ve hit the jackpot and it coats the spoon like a dream, jackpot – you’re almost there.
Remember, this isn’t the grand finale, it’s the crescendo! You’ve mastered the mix; now let’s cool our heels (and our wax) and prep for the grand application. Transitioning smoothly into the next stage is key, so as your wax is chillin’ like a villain, let’s talk about setting the stage for a smooth performance in the Cooling and Testing Your Concoction section coming up next.
Cooling and Testing Your Concoction
Alright, my dear waxing warriors, we’re at that critical juncture where patience truly becomes a virtue – the cooling phase. Let me tell you, getting this part right is crucial unless you fancy yourself a modern-day Icarus, flying too close to the proverbial sun with your hot wax! Here’s the skinny on how to make sure your DIY sugar wax sets to perfection.
The Waiting Game: Wax Cool-Down Techniques
First things first – don’t get antsy and slap that goop on too soon; a proper cool-down is a must! Now, the science bit: sugar wax needs to hit the Goldilocks zone – not too hot, not too cold, but just right. Spread your freshly brewed magic mix onto a piece of parchment paper or a silicone baking mat, will ya? It helps it cool evenly, without turning your kitchen counter into something out of a horror flick.
- Pro Tip: A fan can speed things up, but keep it at a low setting for a gentle breeze.
Conducting the Thumb Test
Once the wax is no longer lava-like, it’s time for the thumb test (cue suspenseful music). Dip your thumb in…and if it comes out non-scalded and the wax is malleable, we’re in business! Remember, too hard and you’ll be chiseling it off; too soft and you might as well call it syrup.
“Patience is the companion of wisdom.” Keep this in mind as you wait for the right moment to test your wax.
Troubleshooting Common Cooling Conundrums
Got yourself a cooling conundrum? If it sets too fast, microwave it a few seconds. If it’s still too runny, a little more cook time might be needed. Trust me, there’s no shame in a bit of trial and error – that’s the secret sauce of sugar wax mastery.
- Note: Always monitor any reheating closely – sugar can go from 0 to 100 real quick!
And once your masterpiece is set, don’t forget the satisfaction of peeling it off the paper – it feels like you’re unveiling your own sweet, sticky treasure. But hold your horses! Before we get to slathering and ripping, let’s take a moment to ponder our next steps, shall we?
Onward to Application Techniques for Smooth Results, where we’ll dive into the finesse of applying that glorious goo in a way that’ll make even the pros raise an eyebrow – in a good way, of course.
Application Techniques for Smooth Results
Hey there, sugar! Ready to get that skin as smooth as a baby’s bottom without a hint of lemon in sight? Let’s get down to the nitty-gritty of application techniques for your homemade, citrus-free sugar wax. If you do it right, you’re gonna be sleeker than a seal—trust me, I’ve been at this sugaring game for a hot minute.
Smoothing it On: Best Practices
First things first, make sure your skin’s clean, dry, and free of oils or lotions—just like prepping for a paint job, ya know? Scoop out some sugar wax and gentle-like warm it between your fingers. We’re aiming for that pliable, taffy-like consistency. Now, against the grain of your hair growth, spread that wax on with confidence. But hey, not too thick, or you’ll end up stickier than pancake syrup on a toddler’s fingers. A thin, even layer is your ticket to smooth city.
The Flick of the Wrist: Perfecting Your Technique
- Press down on the wax with some fabric strips, or go commando-style if you’re feeling brave.
- Hold your skin taut—think face-lift taut—and with a quick flick of the wrist, remove the wax in the direction of hair growth. It’s all in the wrist action. Like throwing a frisbee or flipping a pancake without the splatter.
- Remember, if you hesitate, the wax won’t take pity on you. Be swift and assertive! Your skin will thank you.
Aftercare: Keeping Skin Svelte Post-Wax
Done ripping? Give yourself a pat on the back… gently, though. Your skin might be a tad vocal right now with all the fuss. Slap on some soothing aloe or any after-wax lotion you’re sweet on to calm things down. Avoid steamy showers and tight clothes for a bit to prevent irritation—and please, let’s leave the exfoliation for another day, okay?
And there you have it! You’re now officially a sugar waxing artiste. Don’t worry if you’re not pitch-perfect the first time around; even Van Gogh didn’t start with a masterpiece. Keep practicing, and you’ll be a smooth operator in no time.
Eco-Friendly Clean-Up After Sugaring
Coming up next, we’ll dive into how to turn your post-wax chaos into order again with some eco-friendly clean-up tips. Stay tuned, as we’re about to get into the eco-nitty-gritty of tidying up without toying with Mother Nature’s good graces. And who knows, you might just find a couple of handy tricks to keep your conscience as clean as your skin.
Eco-Friendly Clean-Up After Sugaring
So, you’ve just wrapped up your sweet sugar waxing session, and let’s face it – your kitchen looks like a scene from “Sticky Situations: The Untold Story.” Fear not, my eco-warrior friends, because I’ve got the scoop on how to get things squeaky without turning your abode into a chemical wasteland.
Cleaning Waxed Surfaces Naturally
First things first, let’s tackle that goop! Hot water is your BFF here. It’s like, “Oil, begone!” But the trick? Patience, my dear Watson. Lay a warm, damp cloth over the mess, give it a minute – literally – then wipe. The heat loosens the wax, and – bam – it wipes away cleaner than a whistle. And hey, if you’re dealing with fabric, a quick trick is to throw it in the freezer. I know, sounds crazy, right? But once that wax is frozen, it’ll chip right off! Pro tip: If you’ve got a dab of wax laughing back at you from your counter after wiping, a mixture of oil (like olive or coconut) with a sprinkle of baking soda can tackle that leftover stickiness.
Storing Leftover Wax Properly
Alright, savvy saviors of the planet, what do we do with the extra goo? Toss it? As if! Pour that liquid gold into a silicone cup or an airtight container, and chill. No, not you— the wax! It’s like leftovers, but for your body. When you’re ready for your next wax, reheat that potion, and it’s like you’ve got a brand new jar. ♻️
Tips for a Zero-Waste Waxing Process
Last on our list but certainly not least, let’s keep it green. Use a fabric strip you can wash and reuse instead of constantly throwing away. Think about it, it’s not just economically savvy, it’s environmentally sexy! And for wiping up spills and hands, invest in some cloth rags. They’re like paper towels’ cooler, much hipper sibling that you can wash and use till the end of time (dramatic, but you get the point). “Reduce, reuse, recycle!” as they say.
And remember, once you’re all cleaned up, don’t forget to moisturize. It’s like the cherry on top for your post-sugaring ritual. Stay tuned for the next slice of sugaring wisdom where we’ll dive into the FAQs about this lemon juice-free lifestyle!
Hey there, sweet cheeks! 🍑 Ever find yourself knee-deep in sugar wax and thought, “Hmm… that tangy kick of lemon juice is cramping my style?” Fret not, sugar stars, ’cause today, we’re dishing out the lowdown on going rogue without the citrus brigade. 🍋✖️ Let’s get down to the nitty-gritty, shall we?
First up, let’s chat about Alternative Acidic Substitutes Effectiveness. So you’ve given lemon the boot—what’s the plan? Vinegar could save the day; it’s like lemon juice’s second cousin twice removed. It has the oomph to get the pH balance on point for your sugary potion. A tad of vinegar, and you’re golden! Honey, you’re not making a salad dressing; you’re crafting a wax masterpiece, so trust the acid to work its magic. 💫
But wait, there’s more! You’re probably wondering about the Shelf-Life of Lemon-Free Sugar Wax. “Will it last?” I hear you ask. Well, honey-bunch, without Mr. Lemon, your sugar wax might need a tad more TLC. Generally, it can chill in your fridge for about four weeks. If it gets frosty or weepy on ya, just give it a gentle, warm embrace (microwave or water bath will do), and it’ll bounce right back to life!
Moving on! Allergies got you on edge? Let’s ease into Addressing Allergy Concerns. Sans lemon, you’re still in the clear, skin-wise. Sugar wax is kinder than a grandma knitting mittens, so most folks won’t have any beef with it. If your skin’s the sensitive type, chat with your doc or do a patch test. Better safe than sorry, am I right?
To wrap this up, folks, sugar waxing without that zesty lemon isn’t a journey into unknown lands; it’s just a detour on the road to Silky Smoothville. No more side-eyeing the fruit bowl before your hair-removal ritual. If you’ve got questions, throw ’em my way—I’m here to spread the gospel of sugar waxing, one flick of the wrist at a time. 😘
Overall, going lemon-free is like discovering the lost chord in your fave rock song. Trust your instincts, work that wax, and always keep a keen eye on how your skin’s chiming in.
Catch ya on the flip side, and thanks a million for dropping by! Keep it smooth and sassy, ya’ll! ✨