
So, you’re telling me you’ve never experienced the enchantment of dehydrated marshmallows? Oh, buddy, you’re in for a treat! You know, those tiny, crunchy bits of delight you’re always fishing for in your cereal? Yeah, those guys. But better. Because when you make ’em at home, it’s like unlocking a new level of deliciousness. It’s not rocket science, and trust me, you won’t need a PhD in Candyland to whip up a batch. Let’s jump right in, shall we?
The Lure of Texture and Taste
I mean, who isn’t a sucker for that crispy-on-the-outside, airy-on-the-inside charm of dehydrated marshmallows? The texture alone is enough to make your taste buds do a happy dance. And the taste? It’s like a sugar rush without the crash, pal. Add ’em to your hot cocoa, sprinkle over ice cream, or heck, gobble them straight outta the jar – no judgment here!
Home-Made vs Store-Bought
Now, store-bought dehydrated marshmallows are fine and dandy, but homemade? That’s where the magic happens. You see, when you DIY, you have the power to customize. Want to add a dash of cinnamon or a hint of vanilla? Go for it. Plus, you get to say goodbye to that feeling of betrayal when you reach the bottom of the cereal box and realize you’ve been duped – not enough marshmallowy goodness.
Essential Tools for Dehydration
Lemme tell ya, the right tools can make or break your marshmallow mission. A dehydrator? Ideal. An oven? It’ll do in a pinch. Patience? Non-negotiable. Because perfection takes time, my friend. Get these tools lined up, and you’re halfway to marshmallow nirvana.
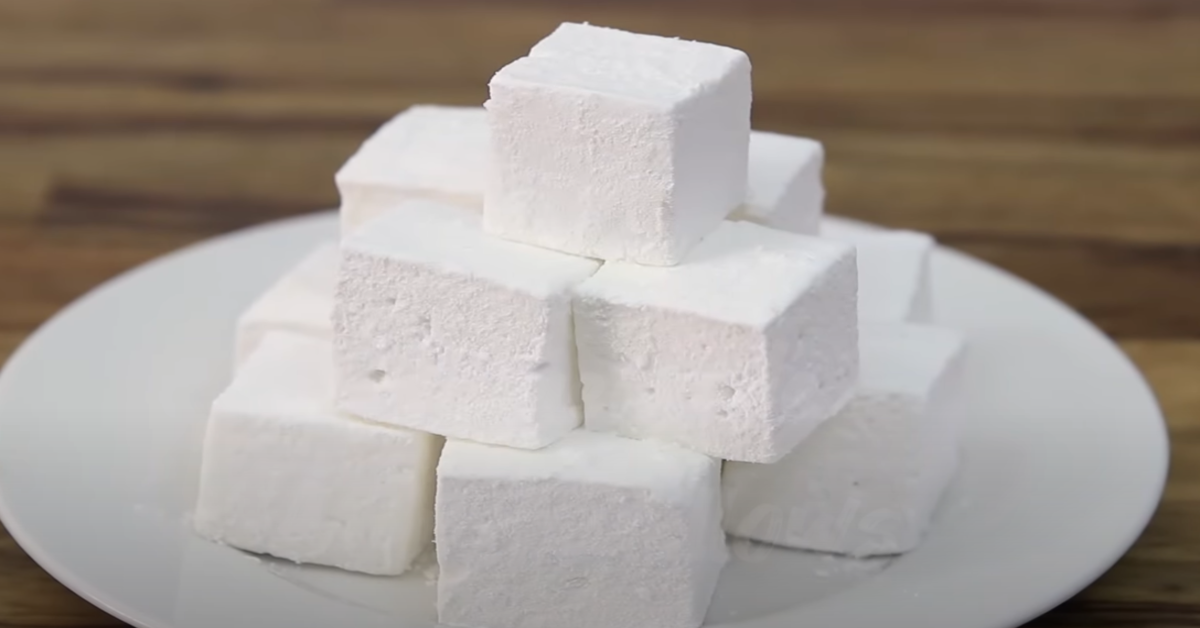
Next on deck, we’re gonna size up these puffy treats. Oh yes, size matters, and I’ll show you how to pick the perfect squad of squishy soldiers for your dehydration journey. But for now, just imagine the possibilities – a world where your pantry is never without that crunchy, sugary bliss. Stick with me, kid, we’re just getting started!
Selecting Your Puffy Treats Wisely
Ever find yourself in the marshmallow aisle, scratching your head at the sheer variety of these puffy treats? Well, my friends, it turns out that when it comes to dehydration, not all marshmallows are created equal. Let’s get into the nitty-gritty of picking the perfect candidates for that irresistible crunch.
Types of Marshmallows Explained
First off, did you know marshmallows come in a smorgasbord of shapes and sizes? There are your classic minis, perfect for a quick pop in the mouth. Then there’s the jumbo kind, which, let’s be honest, is like hugging a cloud (and then eating it). But for dehydration? My bet’s on the minis – they transform into little bites of heaven faster and more evenly.
Size Matters: Choosing the Right One
- Mini marshmallows are top-notch for dehydrating. They’re like the Goldilocks of the marshmallow world – just right.
- Jumbo marshmallows, on the other hand, can be a bit of a beast. They take longer and can end up as a gooey mess if you’re not careful.
Flavor Fusions: Experimenting with Tastes
Now, let’s talk flavor! Plain ol’ vanilla is classic, but why not jazz it up with some root beer float marshmallows? Or heck, throw caution to the wind and mix in some chocolate or fruity flavors. Just remember that the stronger the flavor, the more punch it’ll pack once dehydrated.
So now that you’ve got your marshmallows lined up like little soldiers, ready for action, what’s next? Well, stick around, because we’re about to dive into the pre-dehydration prep work that’ll set you up for success. And trust me, a little patience here will take your treats from amateur hour to pro-status faster than you can say “crunch”!
Pre-Dehydration Preparations Unveiled
Alright, folks, roll up your sleeves because we’re about to get into the nitty-gritty of pre-dehydration prep. Ever tried to assemble furniture without sorting the pieces first? Yeah, don’t be that person. Prepping marshmallows is kinda similar, and I must say, a lot more fun (and edible).
Cleaning and Prepping Your Space
First up, let’s talk about your workspace – cleanliness is next to marshmallowly-ness, ain’t that right? Make sure your kitchen counter is cleaner than a whistle. We wouldn’t want any wandering pet hairs to become part of our snack, right? Clear off a nice, big area because you’re gonna need room to spread out.
Arranging for Optimal Airflow
Next, let’s chat about the marshmallow dance floor. It’s all about arranging those bad boys with enough space for a little air-salsa. They need to breathe, folks! So, space ’em out like you’re avoiding that one aunt at a family reunion – a good inch apart should do the trick. This way, every puff gets its fair share of the drying action.
Patience Is Key: Drying Before Dehydration
And now, for a touch of patience – the secret ingredient. Before we throw these puppies into the dehydration playground, they’ve gotta be drier than a comedian’s wit. This means leaving them out for a bit to shed any excess stickiness. Think of it as a little pre-game before the main event. Trust me, this step is crucial for achieving that crunch we all crave.
So far so good, right? You’re practically a marshmallow-prepping ninja now. But don’t get too comfy just yet. We’ve got the stage set, and the audience in place, but the show’s only just about to start. Stick around as we dive into the next thrilling chapter: Mastering the Dehydrating Methodology. It’s going to be electrifying!
Mastering the Dehydrating Methodology
Alright, my marshmallow-loving friends, let’s roll up our sleeves and get down to the nitty-gritty of dehydrating these puffs of joy. Whether you’ve got a dehydrator or just a trusty oven, I’ve got some tips that’ll turn you into a marshmallow-crisping wizard.
Dehydrator Delights: Techniques for Pros
Got a dehydrator? Lucky you! Dehydrators provide an even and consistent heat that’s ideal for making those marshmallows extra crispy. Here’s how to work the magic:
- Spread ’em out: Lay out your marshmallows on the dehydrator trays. Ensure they’re not touching; we’re not looking for a marshmallow mosh pit here!
- Low and slow: Set your dehydrator to around 160°F (or follow your model’s instructions). This isn’t a race, folks – patience brings perfection.
- Flip and rotate: Every few hours, give those trays a little rotation and flip your marshmallows to ensure an even dry. It’s like giving them a little sunbath.
Oven-Dehydrating: An Alternative Approach
No dehydrator? No problem! You can still achieve crispy cloudlike wonders with your oven. Just follow these steps:
- Preheat to the lowest setting: You want to dry them out, not bake ’em into a gooey mess, so keep that oven on the lowest possible heat.
- Door ajar: Prop open your oven door a smidge to let out moisture. It’s like cracking open the window after you’ve accidentally burnt the toast – essential for fresh air!
- Patience, part deux: This process can take several hours, so grab a book or binge-watch your favorite show while you wait.
Monitoring Progress for Perfection
Keep a keen eye on your marshmallows as they transform. They should feel light as a feather and sound like the crunch of autumn leaves underfoot when they’re done. If you’re not sure, take one out, let it cool, and do a taste test. If you “accidentally” eat a handful, I won’t tell.
Now, as you ponder the possibilities of your soon-to-be crispy marshmallows – perhaps fluffy Kodiak pancakes topped with these dehydrated delights – remember that the fun doesn’t stop here. Next up, we’ll be exploring the drying nuances to achieve that optimum consistency. Stay tuned, and keep that dehydrator humming!
Drying Nuances for Optimal Consistency
So you’ve gone and spread your marshmallows out and you’re ready to roll. But wait up, cowboy! Achieving that chef’s kiss crunch isn’t just about throwing them into the dehydrator and hoping for the best. It’s an art—a delicate ballet of conditions and timings that could make or break your sugary masterpiece.
First things first—let’s talk timeframe. You’re not baking a potato; this isn’t a “set it and forget it” deal. Starting with a standard baseline amount of time is fine, but keep your peepers peeled! Depending on whether you want a toothsome snap or just a light crisp, you’ll need to adjust the time. Mini marshies might only need a couple of hours while those jumbo lads could take all night. It’s like watching paint dry, only a lot tastier!
- For mini marshmallows, aim for 2-4 hours of drying time.
- Jumbo marshmallows can take from 8 hours up to a full 24!
And then, we’ve got humidity woes. If you’re living somewhere that feels like you’re swimming through the air, guess what? Those puffy buddies are gonna take longer to dry. Pro Tip: Run a dehumidifier in the room or wait for a less sticky day.
To avoid under or over-drying tragedies, it’s all about vigilance—keep checking on them. “But how do I know they’re done?” I hear you cry. Do the squish test. Gently press on one—if it yields but snaps back, it’s got the crunch factor. If it’s squishier than your couch cushions, it still has a rental agreement with Camp Moist.
Anecdote Time! My buddy Jeff once left his mega-mallows in the dehydrator while he binge-watched an entire TV series—a rookie mistake. The marshmallows ended up with the texture of chalk. They crumbled on impact and don’t get me started on the taste—like sugared sadness. Learn from Jeff; don’t dehydrate and binge!
Transitioning to a Wonderland of Usage
I know you’re itching to toss these bad boys into every dish you can think of but hang tight. There’s a whole gamut of creative culinary uses we’ll get into in the next section, from kids’ parties that’ll make you the Coolest Parent of the Year to jazzing up your morning joe. Buckle up, because we’re about to take flight into the exciting stratosphere of crispy marshmallow innovation
Creative Culinary Uses of Crispy Marshmallows
Oh, hey there sugar sleuth! If you’re like me, you’ve been living in a vanilla world until the grand epiphany of dehydrated marshmallows hit! And let me tell ya, it’s a game-changer. So here’s the scoop—once you’ve nailed that marshmallow dehydration, it’s time to let your culinary imagination run wild!
Confectionery Creativity: Desserts and Beyond
- Picture a whimsical shortbread cookie sprinkled with these tiny puffs of joy.
- Or maybe, just maybe, take them for a savory spin! Imagine a sweet potato casserole topped with crunchy, candied marshmallows. Mind blown, right?
- Love baking? Swirl them into brownies for that surprise texture, or go full Willy Wonka and create marshmallow-studded chocolate bark.
S’mores Reimagined: A Twist on the Classic
Ah, S’mores. The campfire classic. But hold onto your hats—’cause when you swap in crispy marshies, it’s like a flavor rocket to the stars. Sandwich them between graham crackers and a chunk of chocolate, and you’re boarding the delicious express.
Beverage Toppers: Elevating Hot Drinks
- Now, warm drinks get a whole lot fancier when you float a handful of these crispy delights on top. Hot cocoa? More like haute cocoa.
- And for you audacious adults, a pinch of these dehydrated darlings on an Irish coffee will have your taste buds doing the Riverdance.
But hold up, don’t just throw ’em in and forget ’em. There’s an art to keeping these dehydrated delights prim and proper, and you’ll wanna master that next. It’s about sealing in the freshness and setting up shop for the long haul. You’ve got to treat ’em like the gems they are, or they’ll become sadder than a melted snowman come springtime. Onwards, my fellow snack-stronauts!
Preserving Your Sugary Spectacles
Well, butter my biscuit and call me a marshmallow connoisseur, you’ve done it! Now that you’ve got these whimsical wonders down to a science, let’s yap about cling wrapping these bad boys to keep ’em fresher than a pillow with a mint on it. Sealing in Freshness: Storage Solutions is the name of the game, and I’m about to unveil the sorcery that keeps your treats as crisp as your grandma’s Sunday hat.
- Stack ’em Up: Use a nifty airtight container and layer your crunchy treasures with wax paper in between — it’s like playing Tetris but with tastier results.
- Avoid Sog City: Toss in a couple of those desiccant packets – yeah, the same ones you find in shoeboxes – to ward off moisture like a backyard scarecrow.
And here’s a pro tip, straight from my kitchen to yours: If you notice ’em startin’ to stick together like they’re at some sort of marshmallow mixer, give ’em a little shake-a-roo once in a while. It’s like reminding them they need their personal space.
Long-Term Preservation Tips
Thinkin’ of hibernating your stash for a snowy day? Zip them up in a vacuum-sealed bag — it’s like putting them in a time capsule, set to “delicious.” But remember, even the most expertly packaged goodies have a prime before they turn into sad, chewy echoes of their former selves.
Battling the Stickiness: Separation Techniques
- Divide and Conquer: By sprinkling a smidgen of cornstarch or powdered sugar over them, you’re ensuring they stay as individual as the marshmallow-loving maverick you are.
- Keep ‘Em Cool: Not as in shades-and-leather-jacket cool, but think pantry or cupboard — defiantly out of the way of the stove or oven.
Remember, folks, these dehydrated darlings can last long enough to see you through your next few movie marathons, provided you treat ’em right. And sure as sugar, this is sweeter than stealing candy from a baby. Okay, maybe don’t do that. But you get what I mean, right?
Alrighty, let’s saddle up for the next part of this sugar wranglin’ adventure. Ready to fire up those questions like a kid with too much curiosity and a game show buzzer? Hang tight, ’cause we’re diving snout-first into FAQs on Crafting Dehydrated Marshmallows. Spoiler alert: you’re gonna love it more than a squirrel loves a nut hoarding contest.
Well, butter my biscuit and call me a dessert connoisseur, but we’re at the end of our fabulous marshmallowy journey! Now, I’ve gotten a whole bunch of Q’s rattling around from curious cats like you, about these little sugary miracles. So let’s get down to brass tacks and tackle some of those FAQs that’s been keepin’ you up at night, shall we? 😜
Can You Rehydrate Them?
Let’s clear the air really quick—rehydrated marshmallows aren’t quite gonna be the same as those squishy ones fresh outta the bag. Sure, you could try a steam bath or giving ’em a quick dip in some hot cocoa, but let’s be honest, that’s like tryin’ to bring back the ’80s hair bands – some things are just better left in their prime. Stick to enjoying ’em in their crispy glory, and you’ll be golden! 🌟
Are They Vegan-Friendly?
Ah, the million-dollar question! So most marshies out there are more like dairy queens than lean, green vegan machines. BUT here’s the scoop—there are plant-based options out there that ditch the gelatin. Swap in a vegan marshmallow, and Bob’s your uncle, you’ve got yourself a vegan-friendly crispy treat. Just remember to check those labels like you’re an investigator on a hot lead! 🔍
Shelf Life Expectancies
These puppies can last longer than my last diet. Jokes aside, if you play your cards right and keep ’em in an airtight container, away from any nosy pets or mini-humans, they should stay crispy for a good few weeks. Think of it as time-capsuling the crunch, without any funky space-age stuff involved, just good ol’ Ziploc action. Keep ‘em dry and cool, friend, and you’re in for a treat that lingers!
I gotta say, this has been a hoot and a half, uncovering all the ins and outs of dehydrating marshmallows. Next time you’re whip up a hot cocoa or just need a snack that talks back with a crunch, remember these nifty little tips. Thanks for stickin’ around, sugar! Remember, life’s a treat when it’s sweet, crunchy and complete! 😄👋