
Whipping up Homemade Comfort
Hey there, fellow flavor-seekers! Have you ever found yourself standing in the kitchen, craving somethin’ sweet and savory, and thinking, “Why not both?” Well, grab your spoons and aprons, ’cause today we’re diving into the scrumptious world of choco peanut butter. It’s not just a spread, folks – it’s a hug for your taste buds! 🥄🤗
Flavor Fusion: Chocolate Meets Peanut Butter
So, why are we all nuts about this combo? Picture this: the rich, velvety caress of chocolate melting on your tongue, followed by the hearty, earthy embrace of peanut butter – it’s like they were meant to be together, right? Whether it’s slathered on toast or eaten by the spoonful (no judgement here!), this duo is the Batman and Robin of the snack world.
Why Your Pantry Needs This Spread
Let’s get real – store-bought spreads can be a hit or miss, and who knows what sort of preservatives they’re hiding under that glossy surface? Crafting your own choco peanut butter means you’re in the driver’s seat, steering towards flavor town with nothing but the best ingredients (and love, obviously). Plus, you get bragging rights – “Yeah, I made that!” 💪
What’s that? You can practically taste the adventure already? Well, buckle up, buttercup, because we’re just getting started. In the next section, we’ll go on a little treasure hunt for the finest cocoa and peanuts that money can buy – or that you can scavenge from the back of your pantry (no judgement, again). It’s all about quality, baby, and trust me, your taste buds will thank you. 🌟
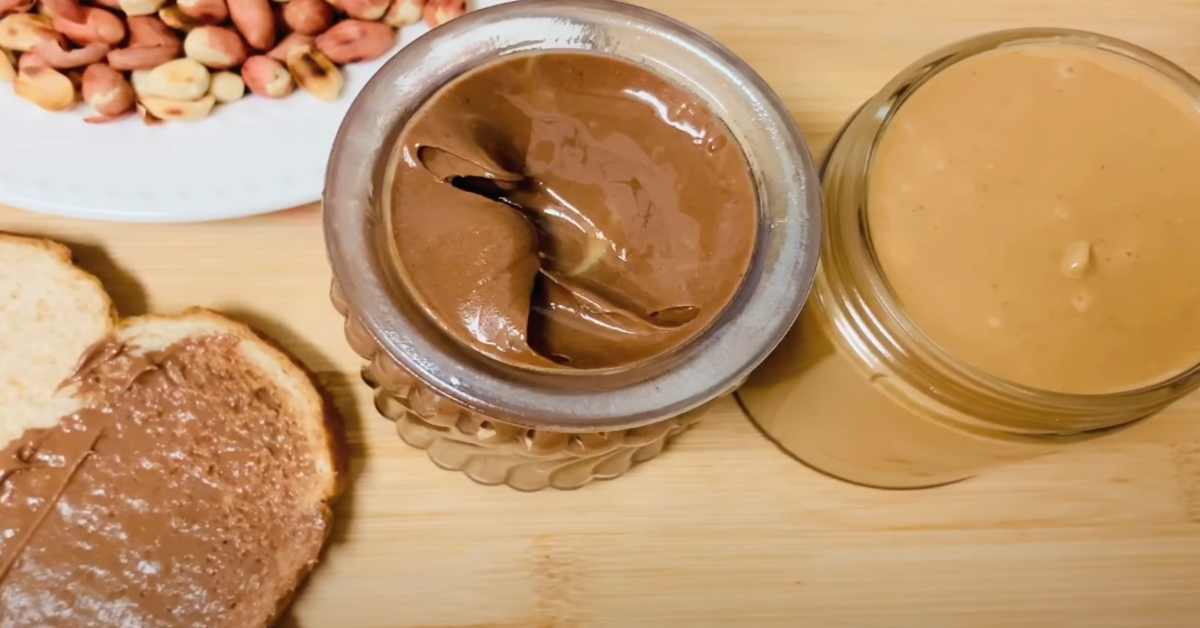
Selecting Quality Ingredients
Alrighty, fellow foodies, let’s talk shop—ingredient shop, that is! When you’re on a mission to create the most mouthwatering choco peanut butter spread this side of the Mississippi, you can’t just grab any ol’ jar off the shelf. No siree, we’re in pursuit of premium stuff here.
First off, the heart of our spread: chocolate. Now, are we talkin’ rich dark, creamy milk, or the fancy-schmancy single-origin kind? Look, my friend, the Search for the Perfect Cocoa is like finding your soulmate—only chocolate won’t steal the covers. So, opt for high-quality chocolate that makes your heart skip a beat (just not literally, keep an eye on that caffeine intake).
- Picking Premium Peanuts
Next up, peanuts! These aren’t just any nuts; they’re the building blocks of our buttery bliss. Go for fresh, high-quality peanuts—roasted, if that’s how you roll. And here’s where things get crunchy: deciding between smooth or crunchy. It’s the age-old dilemma. But hey, why not live a little and try both? Variety is the spice of life, after all.
Now, I know what you’re thinking: “But how do I marry these two into a happy union?” Hold your horses, we’re getting there. But before we do, if you’re curious about other culinary concoctions, check out my chit-chat on fluffy Kodiak pancakes—because who doesn’t love a good pancake?
Armed with top-tier cocoa and the finest peanuts, you’re well on your way to crafting a spread that’s the envy of every jar on the block. Remember, folks, this is more than a spread; it’s a statement. So let’s make it a good one!
Next up, we’re prepping like pros—stay tuned for Prepping with Panache, where I’ll spill the beans (or should I say, peanuts?) on how to set up your spread-making station. Trust me, a little prep now saves a whole lotta mess later!
Prepping with Panache
Alright, folks! Before we jump into the culinary deep end, let’s talk mise en place. That’s a fancy French term for getting all your ducks in a row—or in our case, all those scrumptious ingredients and utensils. ‘Cause let’s be real, nothing’s more frustrating than having to pause mid-recipe to hunt down that elusive spatula, right?
Organize Your Space
First things first: clear that counter. Trust me, you’ll wanna have enough room to do the Choco Peanut Butter boogie without knocking over the sugar jar. And hey, while you’re at it, why not put on some tunes? A little bit of rock ‘n’ roll never hurt nobody, especially when you’re about to create spreadable magic. 🎶
Essential Utensils for the Perfect Mix
- Now listen up, ’cause here’s where the rubber spatula meets the road. You’ll need a sturdy mixing bowl—one that won’t slide around like it’s on a greased ice rink.
- Then, arm yourself with a good spatula. Whether you’re Team Silicone or Team Wooden, make sure it’s flexible enough to scrape down those sides. You want every last bit of that chocolatey, peanut-buttery goodness, don’tcha?
- And don’t forget the whisk! This little guy’s gonna be your best friend when it comes to beating those ingredients into smooth submission.
Temperature Matters: Prepping Your Ingredients
Let me drop some knowledge bombs on ya: ingredient temperature is key. You can’t just expect cold peanut butter to play nice with room-temp chocolate—it’ll be a clumpy disaster! So, do yourself a solid and let everything warm up to the same cozy temperature. It’s like a little pre-party for your ingredients before they mingle and become the life of your snack spread. 🥳
Alrighty, now that we’ve got the prep work nailed down, what do you say we move on to the next step? It’s time to heat things up and introduce our chocolate to some gentle warmth. Trust me, we’re about to get all fired up—in a very controlled and non-burny way, of course. Stay tuned for the meltdown of the century, and I ain’t talking about my last attempt at karaoke. 🔥
Melting Chocolate with Mastery
Alright folks, it’s time to turn up the heat – but not too much, ’cause we’re about to melt some chocolate! If you’ve ever zapped chocolate into a sad, charred mess, you know the pain. But fear not, I’m here to guide you through the whole process so your chocolate will be smoother than a jazz solo on a Saturday night.
Banish the Burn: Gentle Heat Techniques
First off, chocolate is like that one friend who can’t handle the sun – it needs a gentle touch. Always go low and slow. Whether you’re using a stovetop or a microwave, patience is key. So, keep that dial low, and let’s avoid any chocolate tragedies, okay?
Double Boiler Method Decoded
Now, for the double boiler method. You don’t need any fancy gadgets – just a pot and a heatproof bowl. Fill the pot with a couple of inches of water, bring it to a simmer, then turn off the heat. Place chopped chocolate in the bowl and set it over the water. The steam will treat the chocolate like a delicate flower, melting it to perfection. Stir occasionally, and presto – you’ve got smooth, sexy chocolate ready to party with your peanut butter.
Microwave Melting: A Quicker Alternative
On the flip side, if you’re in a bit of a rush – and let’s be honest, who isn’t these days – the microwave can be your best bud. Zap the chocolate in short bursts, 20-30 seconds at a time, and give it a good stir between each round. Keep an eye on it, though; microwaves are notorious for playing hot and cold games.
And speaking of smooth blends, once you’ve got that chocolate melted, you’re gonna want to stir it into the peanut butter like you’re conducting a symphony. But more on that in the next section – for now, let’s focus on not turning your chocolate into a lumpier mess than a teenager’s bed after laundry day.
If you’re looking for some more tips on handling these kitchen capers, check out my piece on how to make fluffy Kodiak pancakes – it’s not chocolate, but hey, we all need a little variety in our lives, right?
Achieving the Ideal Blend
Alright my fellow snackers, you’ve melted your chocolate with the finesse of a chocolatier, and your peanut butter is sitting there looking pretty. But hark! The grand symphony of snackdom is about to hit a crescendo: it’s mixing time. Now, this ain’t just flinging the two together and hoping for the best. You’ve got to finesse this baby to creamy perfection.
The Golden Ratio: Chocolate to Peanut Butter
First things first, let’s chat about ratios. You’ve heard the one about the “golden ratio” in art, right? Well, we’ve got our own in the kitchen, and it’s all about balance, folks. Too much chocolate and you’ll overpower the nutty goodness; too little and, well, why bother? I like to kick things off with a one-to-one ratio, but hey, isn’t variety the spice of life? Tweak it till it twirls your taste buds.
Stirring Strategies for Smoothness
Next up, the stir-off. You don’t wanna be too rough here; we’re blending families, not starting a turf war. Imagine you’re coaxing the chocolate and peanut butter to become best buddies. Use a rubber spatula to gently fold them together – it’s like a gentle hug, ensuring they’re getting along without any clumps feeling left out.
To Whip or Not to Whip
And now, the question that could divide nations: to whip, or not to whip? Whipping introduces air, making our concoction lighter, fluffier, and dare I say, dreamier. It’s great for pretentious peanut butter that’ll spread on toast like a cloud. But if you prefer it old-school, heavy and ready to lay down a firm schmear, then just mix it thoroughly and let it be.
Remember folks, we’re not done yet. This blend of chocolate and peanut butter nirvana is versatile! Keep tuned cause next up, we’re diving into the world of flavor enhancements and twists. It’s like giving your taste buds a surprise party with a guest list tailored just for you. Stay hungry!
Flavor Enhancements and Twists
Alright folks, let’s crank this up a notch! If you’re like me, and just can’t leave a good thing alone, you’re always lookin’ for a way to sprinkle a bit of pizzazz on your pantry staples. Enter stage left: flavor enhancements and quirky twists for your choco peanut butter spread 🍫🥜. Because why settle for fantastic when you can have extraordin-licious, am I right?
Sweeten the Deal: Alternative Sweeteners
Honey, have you ever considered drizzling a bit o’ honey into the mix? Or maybe some maple syrup? These natural sweeteners can add a lil’ somethin’ somethin’ to your choco peanut butter concoction. And hey, for those watchin’ their sugar intake, a dash of stevia or agave nectar could be your new best bud.
Nutty Nuances: Extras for an Unexpected Crunch
If you’re a texture enthusiast – and let’s be honest, who isn’t – tossin’ in some extra nutty nubbins can take your spread from smooth to sensational. Think almond slivers or chopped walnuts for that surprise crunch. Just a heads up, if you’re into pairing up your spreads with other delights, these little gems can make all the difference.
Spirited Spices: Cinnamon, Vanilla, and Beyond
Now, don’t even get me started on spices. A pinch of cinnamon can really make your tastebuds dance a jig. And a smidgen of vanilla extract? Pure, aromatic bliss, my friends. If you’re feeling adventurous, why not a hint of chili powder for a warm kick? Just remember, we’re spicing, not inciting a mouth-pocalypse.
So, there you have ’em – the simple twists that transform your spread into a headliner at the breakfast table. Oh, and don’t forget to share your swanky new spread on your fav crackers, toast, or if you’re feeling fancy, some artisanal bread. Next up, and this is clutch—how to keep that heavenly jar of choco peanut butter as fresh as the Prince of Bel-Air. Stick around!
Storing for Peak Freshness
Alright, fellow spread enthusiasts, let’s dive into the nitty-gritty of keeping that homemade choco peanut butter as fresh as a daisy! Because let’s be real – nobody likes to dig into a jar of their favorite spread only to find it’s turned into a funky science experiment, am I right?
The Ideal Container for Choco Peanut Butter
First up, you gotta kiss goodbye to that flimsy plastic wrap and get yourself a trusty airtight container. Glass is your BFF here – it doesn’t leach any flavors and keeps your peanut butter palace odor-free. Plus, it’s slick as a whistle to scoop from. Pro tip: Slap a label with the date on that jar to keep track of its birthday 🎉
Shelf Life: Fridge vs. Pantry
Now, where to put this jar of chocolatey, peanut buttery gold? Your pantry might be whispering sweet nothings, but for the long haul, the fridge is where it’s at. In cooler temps, your spread stays fresher, longer – think snappier texture, bolder taste. And who doesn’t want that?
- Pantry: Good for a short-term fling, up to a couple of weeks tops.
- Fridge: True love that lasts 2-3 months.
Signs It’s Time to Say Goodbye
Saying farewell is tough, but sometimes you gotta let go. If your choco peanut butter starts smellin’ off, or you spy any funky colors or mold, it’s time to part ways. Don’t take it personally – it’s not you, it’s the spread. A little scoop of prevention: always use a clean spoon to avoid icky bacteria from crashing the party.
After all this talk about preservation, you’re probably itching to whip up another batch or maybe wondering what delicious recipes you can pair with your choco peanut butter creation. But hey, let’s save those tantalizing ideas for the next section, shall we? Stay tuned, because we’ve got more yummy tricks up our sleeves! 🍫🥜
FAQs about Making Choco Peanut Butter
Alright, folks, let’s cut to the chase. I’ve seen y’all squinting at the back of your peanut butter jars like they’re gonna reveal the secrets of the universe or something. So, let’s talk choco peanut butter – that heavenly concoction that’s taken snack time hostage. Got questions? I’ve got answers – and rumor has it, they’re better than Grandma’s secret cookie recipe. 😉
Calculating Calories: Indulgence or Innocence?
Here’s the skinny: if you’re counting calories like a Vegas card shark, remember portion size is key. Homemade choco peanut butter can be healthier than store-bought versions – ’cause you control what goes in. Go easy on sweeteners, and you’re golden! 🥄
Got a nut no-no at home? No problem! Swap out the peanuts for sunflower seeds or soynuts. You’ll still get a spread that’s the bees’ knees – just don’t call it peanut butter, or you’ll have a bunch of confused faces at the breakfast table. 😵
Pairing with Perfection: What Goes Well with Choco Peanut Butter?
- Bread: The OG choice. Slap it on some toast, and you’re out the door.
- Fruits: Apples and bananas are begging for a choco peanut butter dunk. Who are you to deny them?
- Extreme: Waffles. Pancakes. Straight from the jar. Hey, I don’t judge – I’m too busy eating.
So there you have it – the 411 on DIY choco peanut butter. Remember, homemade means you’re the boss. Calories? That’s on you, my friend. Nut allergies? There’s a work-around. Perfect pairings? Anything that fits in your hand, if you ask me. Now go forth and create your magnum opus of munchies – and don’t you forget to lick the spoon! 🥄🍫
Overall, my kitchen’s seen more chocolate peanut butter experiments than a mad scientist’s lab, and let me tell ya, it’s always a blast – even when things get a little nuts. So, put on that apron, and let the alchemy begin!
Thanks a bunch for reading, you lovely spread-spreaders! Stay smooth, and remember – when life gives you peanuts and chocolate, make choco peanut butter. 😉