
Choosing the Right Tools for Your Web Design
Alright my fellow bakers, time to get down to business 😎. First things first, let’s talk gear for that spider web cake that’s gonna knock everyone’s socks off. You wouldn’t paint your masterpiece with a toothbrush, would ya? Nope! So let’s get you equipped with the right tools for an edible work of art!
The Ultimate Piping Bag Setup
Imagine you’re an artist. Your piping bag? That’s your brush. Go ahead and grab yourself a sturdy piping bag that won’t split when you’re in the throes of creation. And hey, if you’re feeling eco-friendly, silicone bags are not only reusable but also give you that extra grip for when the icing battle gets intense.
Selecting a Nozzle for Precision
- Goin’ round: A fine round nozzle’s gonna be your trusty sidekick. It’s perfect for those sleek, sharp lines that’ll make your web look like Charlotte’s been busy.
- Keep it tight: We’re talking small here. A number 2 or 3 tip should do the trick. You want something that’ll let you weave those delicate sugar strands, not spew out like a broken dam.
The Role of Toothpicks in Cake Artistry
Now, don’t underestimate the humble toothpick, my friends. It’s not just for checking cake doneness or fending off miniature appetizer thieves. In the realm of cake decorating, it’s your eraser. Made a boo-boo with your piping? No sweat 😅. Use a toothpick to nudge that icing back into line. Or get wild and use it to create some wicked texture on your web. Pretty handy, eh?
Alright, now that you’re loaded up with the ultimate web-making arsenal, you’re ready to tackle that blank cake canvas. Just remember, it’s not just about the tools – it’s the magic in your hands that brings the cake to life. So let’s keep rollin’ and prep that canvas for your sugary spectacle 🎨!
Preparing the Perfect Canvas
Ever stare at a blank cake and feel a flutter in your stomach? You’re not alone! Prepping your cake for that ultimate spider web decoration is like gearing up for a Broadway debut. It’s gotta be smooth, even, and ready for the spotlight. So, let’s roll up our sleeves and prep that perfect canvas, shall we?
Smoothing With Fondant for a Sleek Surface
First off, fondant is your best pal when it comes to a sleek finish. It’s like dressing your cake in a tuxedo – classic and suave. But remember, fondant can be as finicky as a cat on a hot tin roof. You’ll want to knead it until it’s as pliable as Play-Doh. Then, roll it out evenly, not too thin, not too thick, just right. Drape it over your cake and smooth away any wrinkles or bubbles – think of it as ironing your best shirt for a first date. Voilà! You’ve got yourself a canvas as smooth as ice on a winter’s pond.
Achieving a Flawless Buttercream Finish
Now, if fondant isn’t your cup of tea, buttercream can step in as a creamy understudy. But don’t be fooled by its fluffy nature; a flawless buttercream finish is all in the wrist action. Start with a crumb coat – a thin layer to catch all those pesky crumbs. Then, slap on the second layer, thick and luscious. With a spatula smoother than Sinatra’s voice, glide over the surface to achieve that dreamy, cloud-like finish. And remember, practice makes perfect. If at first you don’t succeed, spread, spread again!
Now that your cake is dressed to the nines, you’re ready to embark on the next sweet adventure: concocting the ideal icing. Stay tuned, dear reader, as we whip up a royal icing that’s fit for a queen and ready to spin into the most enchanting web you’ve ever seen!
Concocting the Ideal Icing
Ever heard someone say “it’s all in the icing”? Well, when it comes to creating a spidery masterpiece atop your cake, they’re not spinning yarns. The key to a web that’ll have your guests a-buzz lies in the consistency of your royal icing. It should be just right – not too runny that it’d slide off your cake faster than butter on a hot skillet, but not so stiff that it feels like you’re squeezing a cement bag. Now, imagine honey on a warm day; that smooth, flowing texture that’s so mesmerizing – we’re aiming for that, but with the tenacity of blooms standing proud in the midsummer sun.
Crafting the Perfect Royal Icing
- Start by whipping up your icing sugar and meringue powder like there’s no tomorrow. But remember – we’re not looking for a storm, just a nice, gentle breeze that gets everything mixed well.
- Now, add water, but in the same way you’d add a splash of milk to your coffee – with care. You’re looking for that Goldilocks consistency: not too thick, not too thin.
- Once it’s mixed, give it the ribbon test. If a drizzle of icing can form a smooth ribbon that holds for a few seconds before sinking back into the mix, you’ve nailed it!
Balancing Consistency and Flow
Ah, the delicate balance! If your icing is too thick, it’s going to be a bear to pipe, and your hand might just fall off from exhaustion. Too thin, and well, you’ll have a slippery mess faster than a greased pig at a county fair. So, add water incrementally – think droplets, not splashes. And always test it on a piece of parchment before you start adorning your cake. If it flows nicely but still holds its shape, you’ve got the green light.
And before you know it, it’s time to dive into the next stage – sketching your web. But don’t rush off! Take a moment to ensure your icing is smooth as silk and ready to make that cake the belle of the ball. Just remember, friends, patience is a virtue, especially in the sweet world of cake decorating. Onwards, to the blueprint of our sugary construction!
Sketching Your Web: A Preliminary Guide
Alright, superstar bakers, you’ve got your canvas prepped and your icing on standby, but before we dive frosting-first into our spider web cake extravaganza, let’s take a hot minute to talk shop about planning. Because let’s face it, a spider doesn’t just throw a web together willy-nilly, and neither should we!
Tracing a Guiding Blueprint
First things first, grab yourself a skewer or a toothpick. We’re gonna sketch it before we etch it. Now, gently, with the finesse of a feather, lightly press a guide into your icing. This isn’t a treasure map, folks, no need to leave permanent marks. You’re just creating faint lines to serve as your spidey blueprint. Remember, the goal here is to make your web as symmetrical as a snowflake, so take your time!
- Start with a straight line down the center
- Add another line perpendicular to the first
- Keep going, dividing the cake into equal segments
Visualizing Symmetry and Space
Now, imagine your cake is the face of a clock. You’re aiming to place the main web lines at the 12, 3, 6, and 9 positions. Then fill in between, like the numbers on a clock. You want it to look like Miss Spider’s been doing yoga – all balanced and zen. So space those lines like you’re divvying up the last piece of pie at Thanksgiving, equal parts for everyone, right?
But wait, there’s more! Once you’ve got your lines all plotted out, it’s time to think about the concentric circles that’ll bind them together. They’re like the rings of Saturn around your radial lines. And hey, if you mess up, don’t sweat it. Just smooth it over and try again – your cake, your rules.
Soon you’ll be ready to pipe like Picasso, but before we get to that, remember, having a game plan is crucial. You wouldn’t build a house without blueprints, and you sure as heck wouldn’t travel without a map (unless you’re into that sort of thing). So, plan your web, and you’re halfway to a masterpiece.
Now, let’s get ready to pipe! But first, if you want to sneak a peek at some more cake artistry, check out the Fluffy Kodiak Pancakes for a little side inspiration. Okay, deep breath – it’s time to bring those sketches to sweet, sweet life!
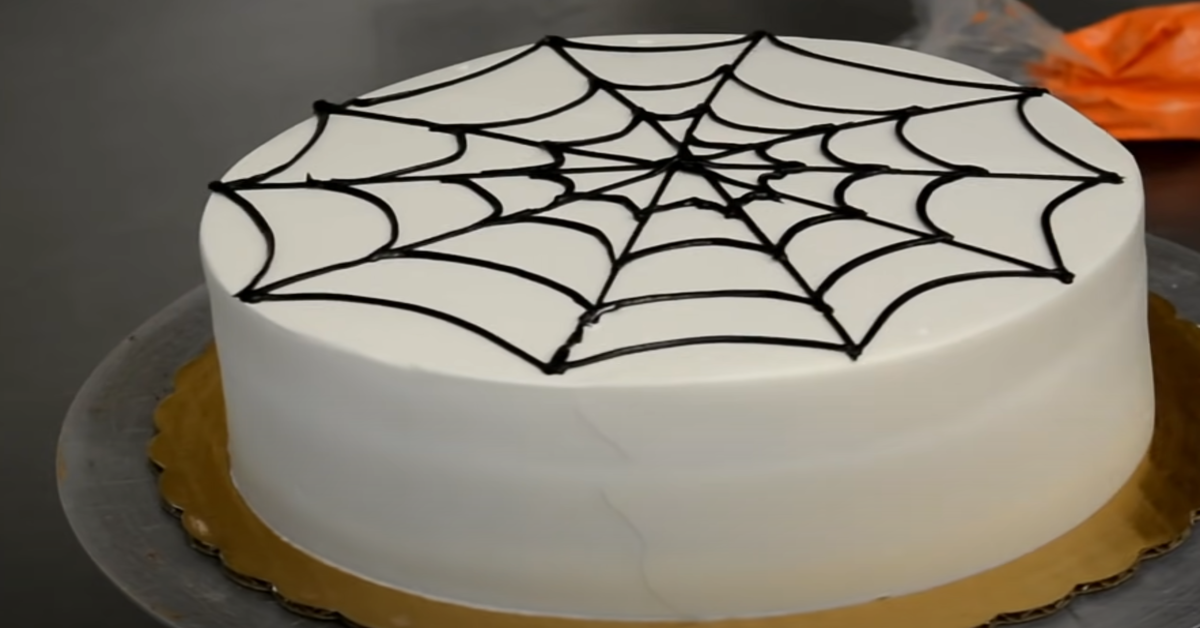
Piping the Web’s Foundation
Alright, cake artists and sweet-toothed sculptors, it’s showtime! Rolling up our sleeves, we’re about to dive into the real meat and potatoes of making that spider web design on your cake – piping the radial lines. Now, don’t freak out on me; I promise it’s like riding a bike, once you get the hang of it!
Creating a Strong Central Point
First off, you need to choose your cake’s quasi-spiderweb ‘North Star’. This central point is where all the magic radiates from, literally. To ensure your spider buddy hasn’t had one too many fermented berries, we keep that central point as stable as a table. Plop down a sweet little dot of icing to mark ground zero and prepare for lift-off.
“Like Michelangelo in his prime, let your icing sing, and define your sweet masterpiece.” – Unknown (but definitely a fan of cake)
Radiating Lines: The Web’s Backbone
From your central sugar beacon, let’s begin drawing the radial lines. They’re like the steel beams in a skyscraper – without ’em, our web’s going nowhere but down. Keep your hand steadier than a neurosurgeon and start piping those lines outwards. Remember, these bad boys set the stage for your web’s entire structure, so make ’em count!
- Keep it straight: Avoid wobbly lines; imagine you’re ruling with invisible ink, right? A straight shot from the middle to the cake’s edge.
- Evenly spaced: Space is key. Give each line its personal bubble; about the same width as a, let’s say, chubby ant. Uniformity’s your friend!
Now, don’t go squeezing that piping bag like you’re testing its limits – gentle pressure, folks. If you squeeze too hard, you’ll have a web fit for King Kong, not Charlotte.
Pro Tip:
To ensure those lines don’t start resembling a game of Twister, find two points opposite each other on the cake’s edge. Now, pipe directly across. Rotate your cake, find another set of points, and repeat. What you’re aiming for is balance, symmetry – you know, that Zen stuff.
Perfect, now that we’ve got the framework laid out, are you feeling a little more confident? You got this! With a little practice, your hands will create a web so convincing, you’ll have to stop your family from calling pest control.
Next up, we’re going to spin this tale even further by weaving the web’s spokes. So, stick around (pun intended), and let’s keep the sugar flowing!
Weaving the Web’s Spokes
Alrighty, cake artists, let’s tango with our piping bags! If you’ve ever watched a spider at work (and managed not to shriek in terror), you’ve seen the magic of web-spinning. Now it’s your turn, and I promise, it’s more fun than freaky. With the main scaffolding of our web – the radial lines – in place, we’re about to make this cake look as if Charlotte herself decorated it.
The Art of Seamless Spinning
So there you are, staring at your beautiful radial lines, and you might be thinking, “Now what?” Well, it’s time to connect the dots—or in our case, lines. We’re making the circumferential threads, those sticky spirals that make flies regret their life choices. Begin at the center, and pipe a small loop connecting each radial line, spiraling outwards. Think of it as making a bunch of little smiles all around your cake – because that’s what your guests will be doing when they see it!
Piping Consistent Web Strands
- Keep Your Distance: Aim for even spacing between the strands for that uniform look. Eyeball it if you must, but try not to have your web looking like it was made during a spider’s caffeinated jitterbug.
- Steady as She Goes: Slow and steady wins the race here. Rushing can lead to wobbly lines – unless you’re going for a web after a hurricane, pace is key!
- Pressure Control: Squeeze that piping bag with a consistent pressure to ensure your icing is as even as your grandpa’s lawn after he’s mowed it. Remember, you want those strands to be as tight as guitar strings.
Now, if you need a bit of inspiration or a tasty recipe to kick things off, check out these fluffy Kodiak pancakes from our recipe trove; imagine them as a warm-up to your web-weaving extravaganza.
As you’re mesmerizing your kitchen audience with your icing skills, remember, the beauty of this edible art is in the details. Turning that cake into a spook-tacular masterpiece isn’t far off now. Just keep swirling, circling, and connecting—before you know it, you’ll have spun a web cake fit for a queen… spider, that is.
And once you’ve mastered this silken feat, it’s time to give your work that extra je ne sais quoi. But hey, how do you take your web from flat to phat? Stick around for our next secret ingredient – a pinch of creativity!
Adding Dimension with Shadows and Highlights
So, you’ve got a web that’s symmetrical, smooth, and slicker than a used car salesman on a hot day? Let’s kick it up a notch! Creating depth with shadows and highlights is like throwing the best surprise party for your cake—it’s all about the ‘WOW’ factor.
First off, say it with me, “Contrast is my bestie!” Want a web that leaps off the cake like a 3D movie? You’re gonna need shades darker than your ex’s heart (just kidding, all love here! 💔). Grab some colored icing, maybe a shade or two darker than your base web color, and pipe carefully on one side of each web strand. Imagine the moon’s casting a gentle glow on your web, and you’re the artist capturing it!
Next, let’s blind ’em with the highlights. Not literally, but you get the picture. A little white icing—the icing equivalent of a highlighter pen—dotted ever so gently on the opposite side of your shadows will make each strand sing with depth. It’s like your web strands hit the gym and came out with swole little strand muscles.
Tips from the Cake Whisperer:
- Practice your shading and highlighting on parchment before taking to the cake, like a dress rehearsal for Broadway.
- Less is more. Think of highlights like cologne; a dab will do!
And, here’s the kicker, lighting is EVERYTHING. If you thought your selfie game was strong, wait till you see how light plays with icing. A strategically placed desk lamp can act as your faux moon, giving you the perfect roadmap for those high-and-low lights.
Finally, don’t forget to step back and admire your work. Adjust as needed, like a DJ tweaking the mixer. And just a heads-up, when you’re done dazzling with dimension, we’ll be jumping right into the FAQs to squash any pesky doubts. But that’s a story for another time. Keep spinning that cake magic until then! 🎂✨
Hey cake decorators! I bet ya got questions simmering on the back burner about turning your cake into a home fit for a sweet eight-legged friend, don’t ya? Well buckle up, ’cause we’re about to dive into some hot FAQs about crafting a spider web on a cake that’ll have you spinning webs like Charlotte herself! 🕸🎂
Frequently Asked Questions on Web-tastic Cake Art
What Icing is Best for Piping Webs?
- Listen up, sugar! Royal icing is your BFF when it comes to web-slinging on cakes. Why? It’s like the Superman of icings – strong and flexible. Plus, it dries hard and shiny, giving your web that glossy look.
Tips for Fixing Piping Mistakes?
- Okay, first off, don’t freak out if your line goes all wonky. You can always gently scrape it off with a small knife or use a damp brush to nudge it back in line. It’s like pretending it never happened, and who doesn’t love a do-over?
- If your icing’s too thin and it starts to look like a sad pancake, thicken it up with a pinch more powdered sugar. On the flip side, if it’s stiffer than a week-old loaf of bread, thin it out with a drop or two of lemon juice or water.
How to Store a Web-Adorned Cake?
- So you’ve spun the perfect web and want to keep it looking fresh? Keep that masterpiece in a cool, dry spot. Humidity is the arch-nemesis of icing, so steer clear of the fridge unless you want a droopy disaster.
And there you have it, folks – your burning questions answered with a dollop of wisdom and a sprinkle of fun. 🍰 If you’ve got more cake conundrums, just holler, and I’ll be there quicker than you can say “pass the piping bag!” Thanks for hanging with me – remember, every mistake is just a stepping stone to sweetness. Keep on caking!
Overall, keep spinning that sugar, and you’ll be a cake web Picasso in no time. In closing, thanks for sticking around, cake pals – ‘til next time, keep those cakes crafty and your spirits high!